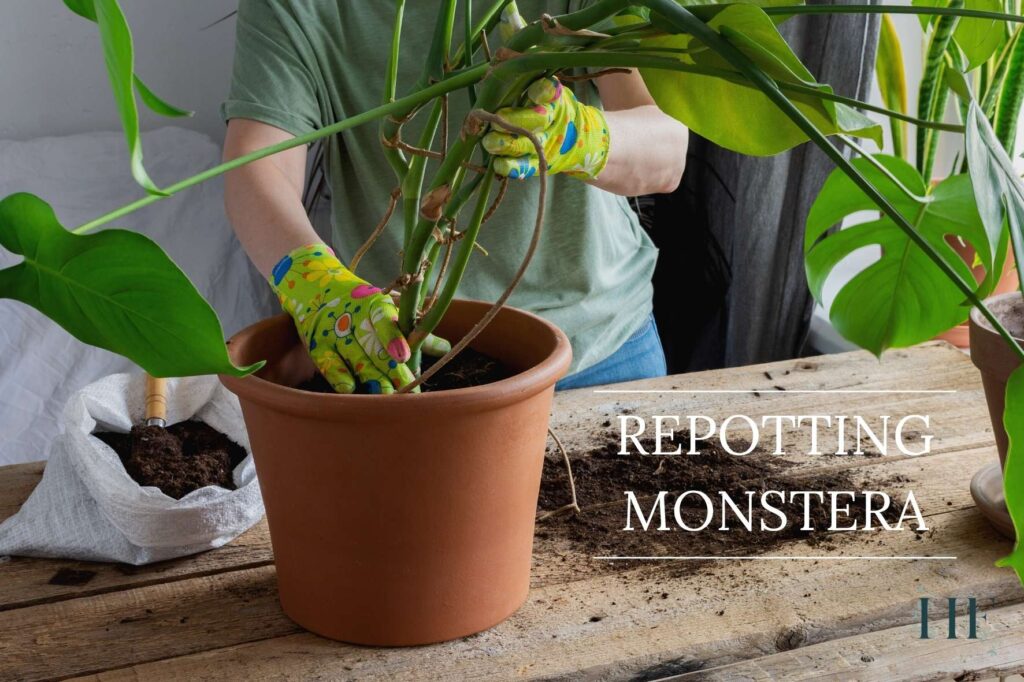
Has your Monstera outgrown its current pot? Or maybe you are wondering when you should be repotting your Monstera?
Let’s find out what to consider when repotting your Monstera plant, and how to go about introducing a pole when repotting, or transplanting a mature Monstera that already has a support structure.
After reading this blog post, you will know how to repot a Monstera without causing transplant shock. Also, I will share my personal tips when choosing Monstera soil and pot size.
When to Repot Monstera
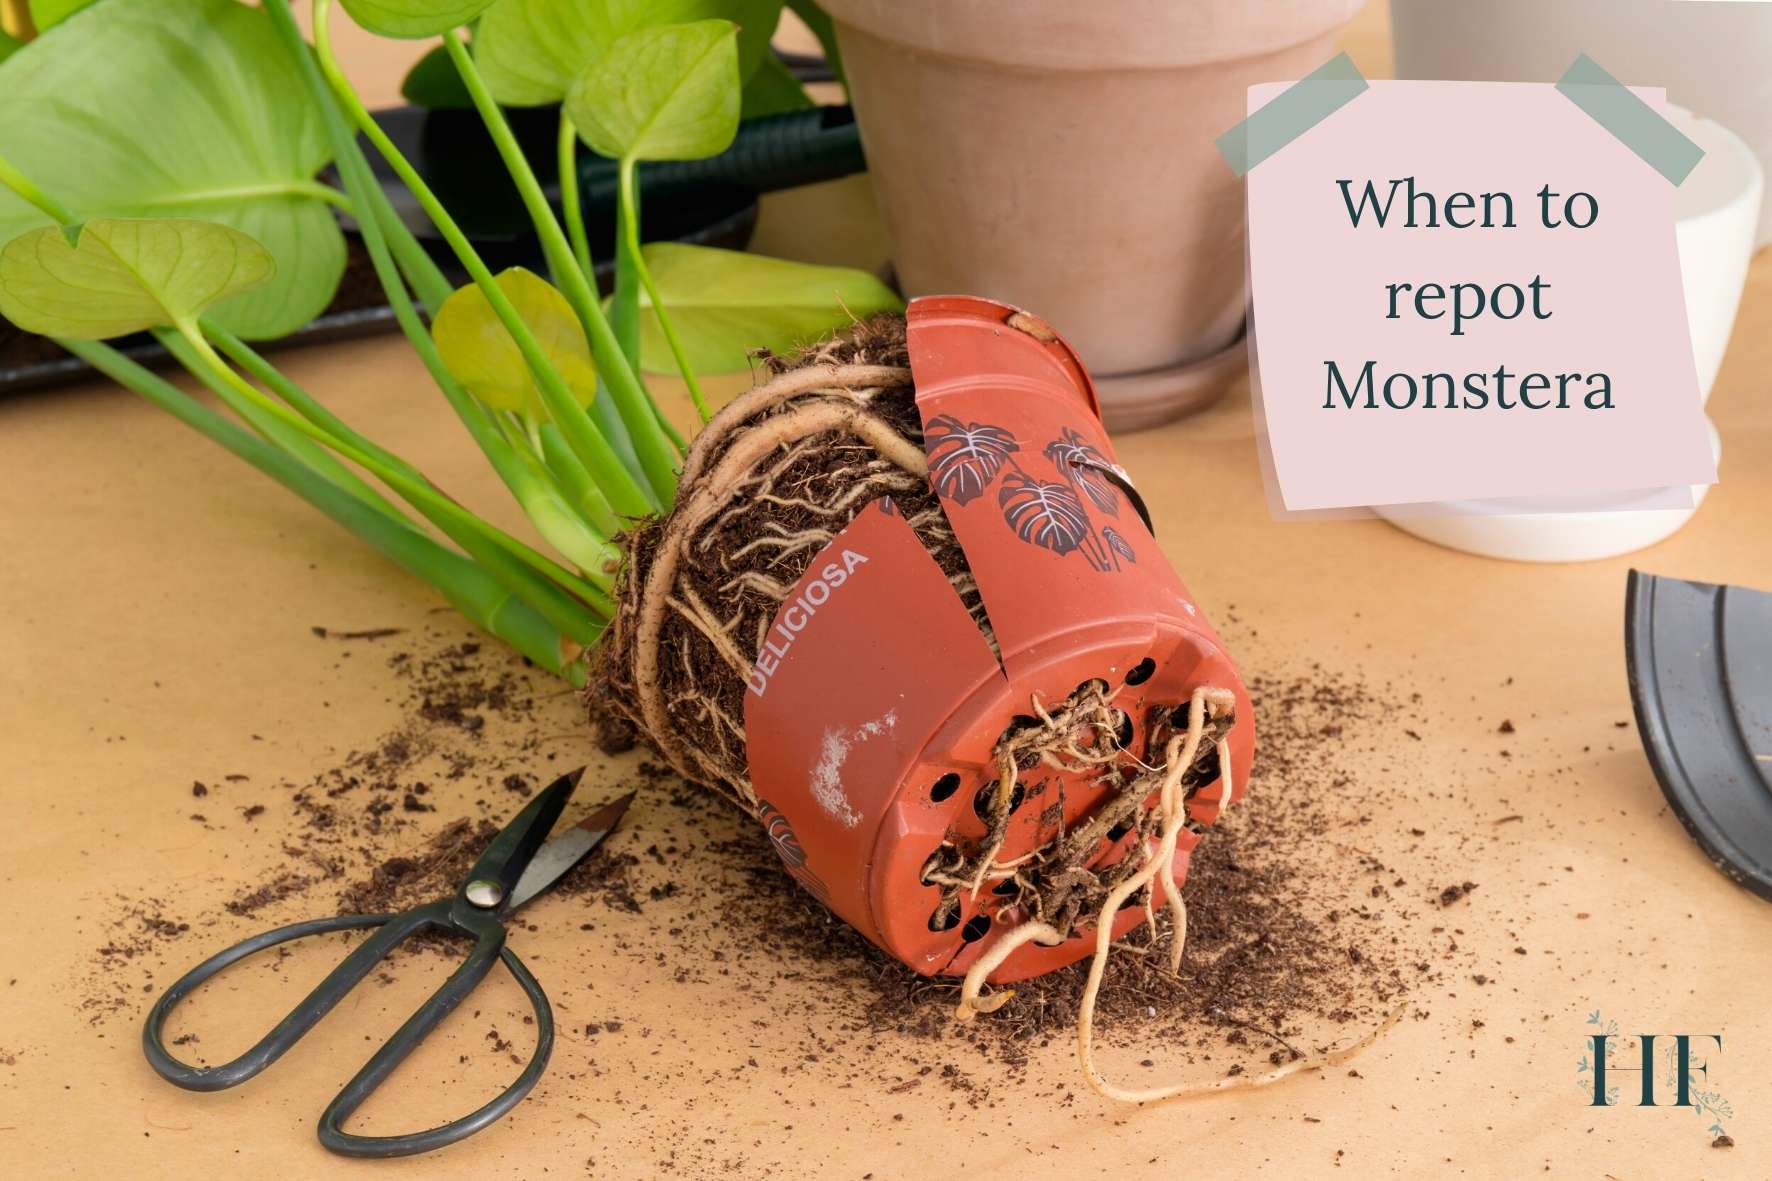
Monstera plants, like any other houseplant, require repotting from time to time. You can plan to repot your Monstera in advance or it may show some signs that it needs repotting.
In general, Monstera plants need to be repotted every 2 to 3 years or whenever they show signs of stunted growth due to being root-bound. For best results, make sure to choose a pot 2 inches larger in diameter and that it has drainage holes.
Repotting will allow your plant to continue growing in a healthy and fresh environment as the roots will have enough space.
Usually, a young Monstera will need to be repotted more often than a mature one.
Also, an adult Monstera can be top-dressed with fresh potting soil rather than repotted. For an adult Monstera, it’s okay for it to be a little pot-bound.
Once your Monstera has reached a large size, and you don’t want it growing too much bigger, keeping it in the same size pot will prevent it from growing too rapidly.
To avoid it getting too pot-bound, you will need to prune the roots and top-dress your Monstera with fresh soil every year in the early spring.
Can I Repot Monstera in Summer?
The best time of year to repot your Monstera plant is in the early spring, just as its growing season approaches. During this time, your Monstera has the greatest chance to adjust to the new conditions in a different pot and fresh soil.
Also, when repotting in early spring, your plant can maximize the growing season by utilizing all those nutrients found in the fresh soil and start to establish itself on the support (pole or trellis) you provide.
However, you can repot your Monstera at any time of the year, if you notice urgent signs that it requires repotting. In this case, your plant may need extra care to prevent transplant shock.
Signs Your Monstera Needs Repotting
It is really important to pay close attention to these signs, and understand why you should repot your Monstera in these cases so that your plant can continue to thrive and grow healthy.
1) Roots Growing Through the Drainage Holes
Roots protruding from the drainage holes are a primary sign that your Monstera needs repotting. If a Monstera’s roots are growing through the drainage holes in the plant pot, it means the plant is root-bound.
A root-bound Monstera doesn’t have enough soil and space to grow, leading to a deficiency of oxygen, water, and nutrients.
For instance, if your Monstera is not getting enough water (as the water cannot be retained when there is insufficient soil), your plant can become dehydrated and you might notice that the leaves start to turn yellow or brown.
Repotting will solve oxygen, water, and nutrient deficiency. Also, it can prevent the roots from being suffocated or damaged in a pot that is too small.
2) Stunted Growth
Since a root-bound Monstera lacks space to grow and is unable to uptake the nutrients needed, it will stop growing. This is also known as stunted growth.
If left unchecked, it will eventually lead to the death of the plant.
A larger pot with fresh potting mix can give your Monstera plant the boost it needs to generate new growth.
However, there may be other reasons why your plant is not growing, like insufficient light, underwatering, or inadequate fertiliser. That’s why it’s important to find the cause before repotting.
Repotting Monstera Step by Step
Before getting started, here are the supplies you will need for repotting your Monstera:
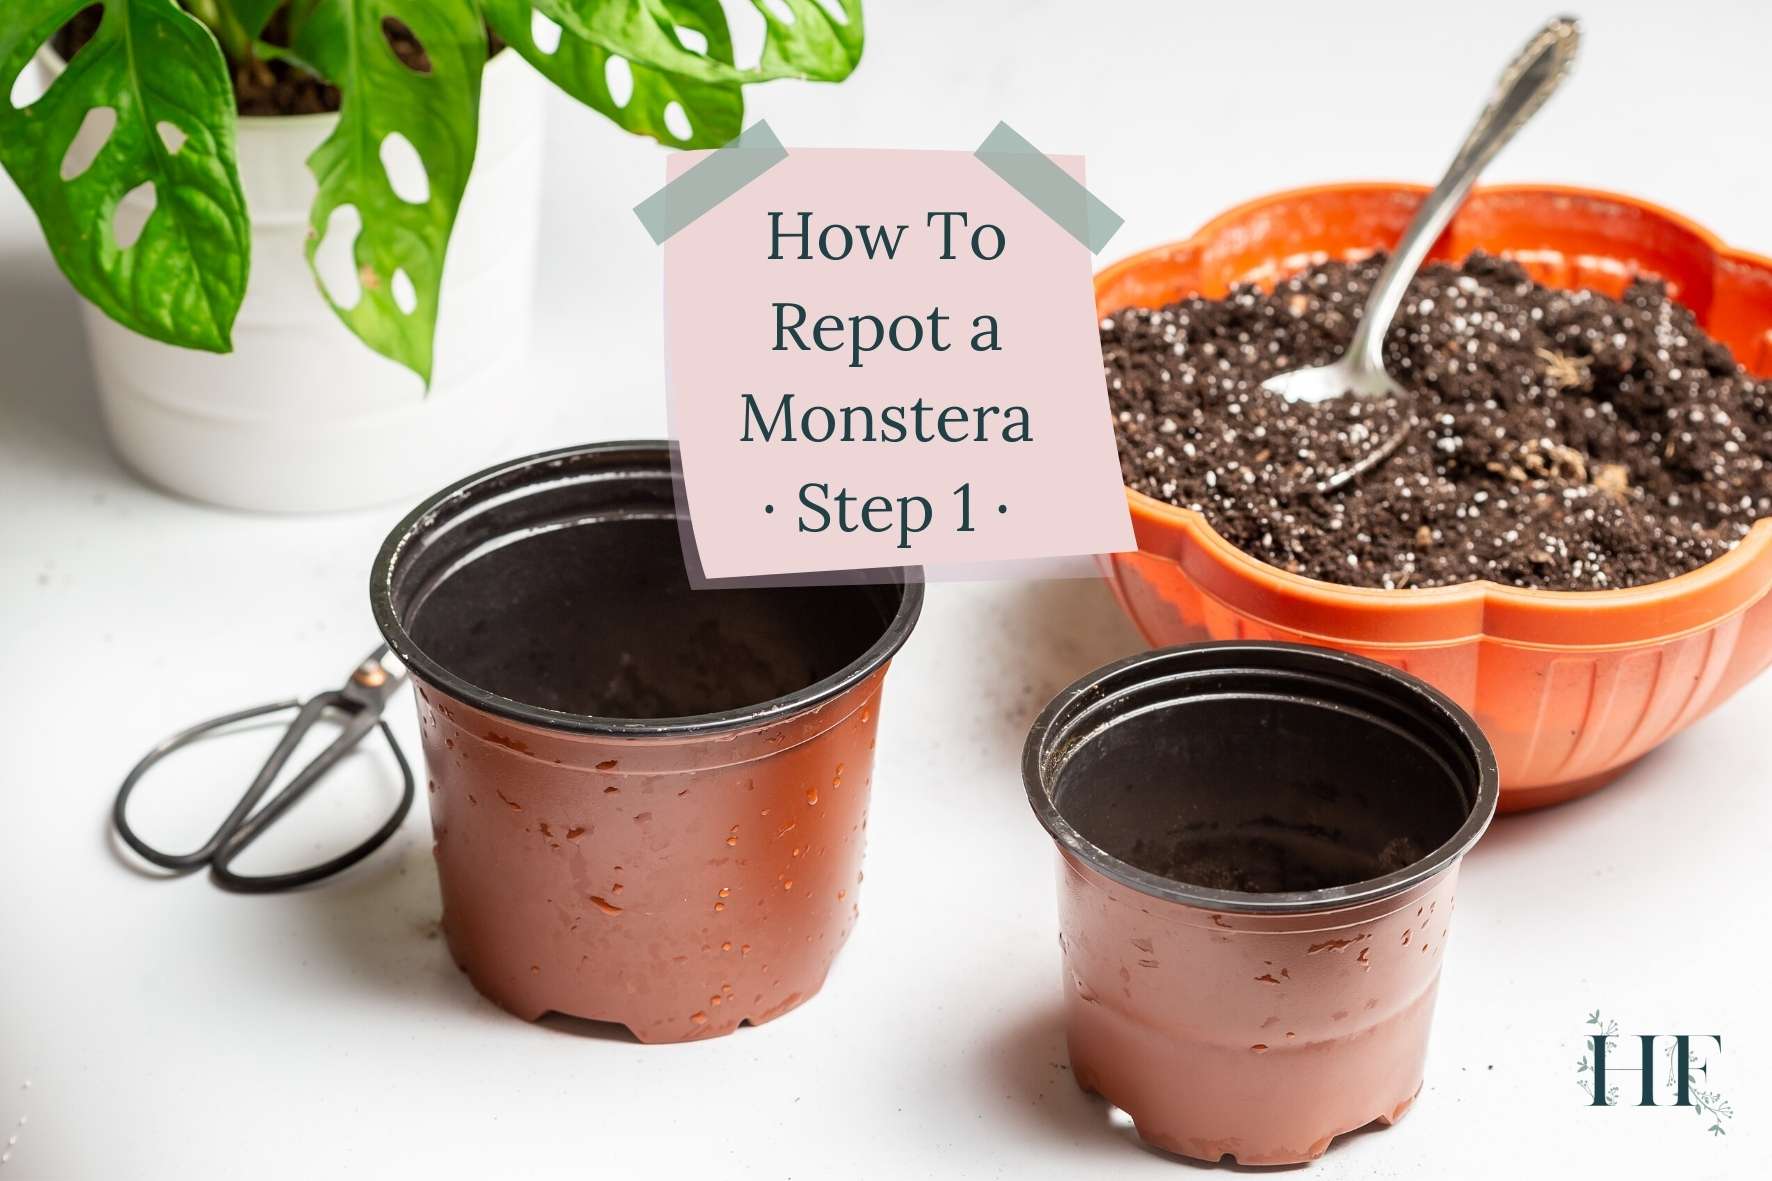
- A pot with drainage holes: Choose a container about 2 inches larger than the current pot, this allows sufficient room for the plant to continue to grow healthily without being too large (preventing root rot). Also, you want it deep enough to accommodate a sturdy moss pole, whether your plant already has one or if you are planning to add one in the future.
- I recommend clear plastic pots with drainage holes, which I then put inside a decorative cachepot. Clear pots allow you to keep an eye on the root system and avoid root rot thanks to their drainage holes.
- A decorative planter or cache pot: Check my How to Choose the Best Pot for Monsteras & 10 Planter Ideas blog post.
- Potting mix: Since Monsteras are an aroid plant, they need light, airy and breathable soil. Monstera plants do best in a light, chunky soil mix with a pH of 5.5 to 7 (i.e., slightly acidic). Check my Which Type of Soil Is Best for Monstera? blog post for more info, including a Monstera repotting soil recipe. Here are some options to achieve this:
- A mixture of indoor potting soil, a handful of orchid bark chips, loose coco coir, perlite or even some organic matter like worm castings.
- A ready-to-go mix of coco coir and perlite into the houseplant compost.
- A Monstera-specific potting soil available on Amazon.
- A trowel: Particularly useful to add the soil into the pot. I like keeping my gardening tools handy when propagating and repotting my houseplants.
- A pair of shears: These should be already sanitized or washed with soap before taking the cutting. I recommend these shears.
- A watering can: A watering can or pitcher will help you direct the water into the soil and avoid wetting the foliage unnecessarily when watering your plants.
- Plant support: Although adding support is optional, repotting is a great opportunity to introduce a support structure since it’s more difficult to introduce a pole to an already established plant. The most common options are a moss pole, a coir pole (which is extendable) and a bamboo trellis.
- Twist ties: You can attach the stems of your Monstera to a pole or trellis using twist ties (this is what I use), which is a rubberised garden wire that doesn’t damage the plant. Avoid using string or twine since it can cut into the plant’s stem.
How To Repot a Monstera (Even With a Moss Pole)
Repotting your Monstera should be straightforward enough. Follow these steps to make the transition easier for your plant while also reducing the risk of transplant shock.
1) Prepare a New Pot, Soil, and Support
Before you get started, ensure that you have everything you will need to successfully repot the Monstera plant. Refer to the list above so you are ready to repot.
Then, sanitize your workspace or cover it to keep the mess to a minimum. Also, you want to wash your tools and pots with dish soap (or white vinegar) to avoid transferring any pests or diseases.
To prepare your new pot for planting, place about 1/4 to 1/3 of the fresh soil mix inside.
If you are adding a new moss pole, you can stick it in the soil, in the centre of the pot, at this stage.
Read also: A Guide to Monstera Training – How to Make Them Climb, where you can find tips on how to place the Monstera stems on the pole and how to encourage your plant to attach to its support.
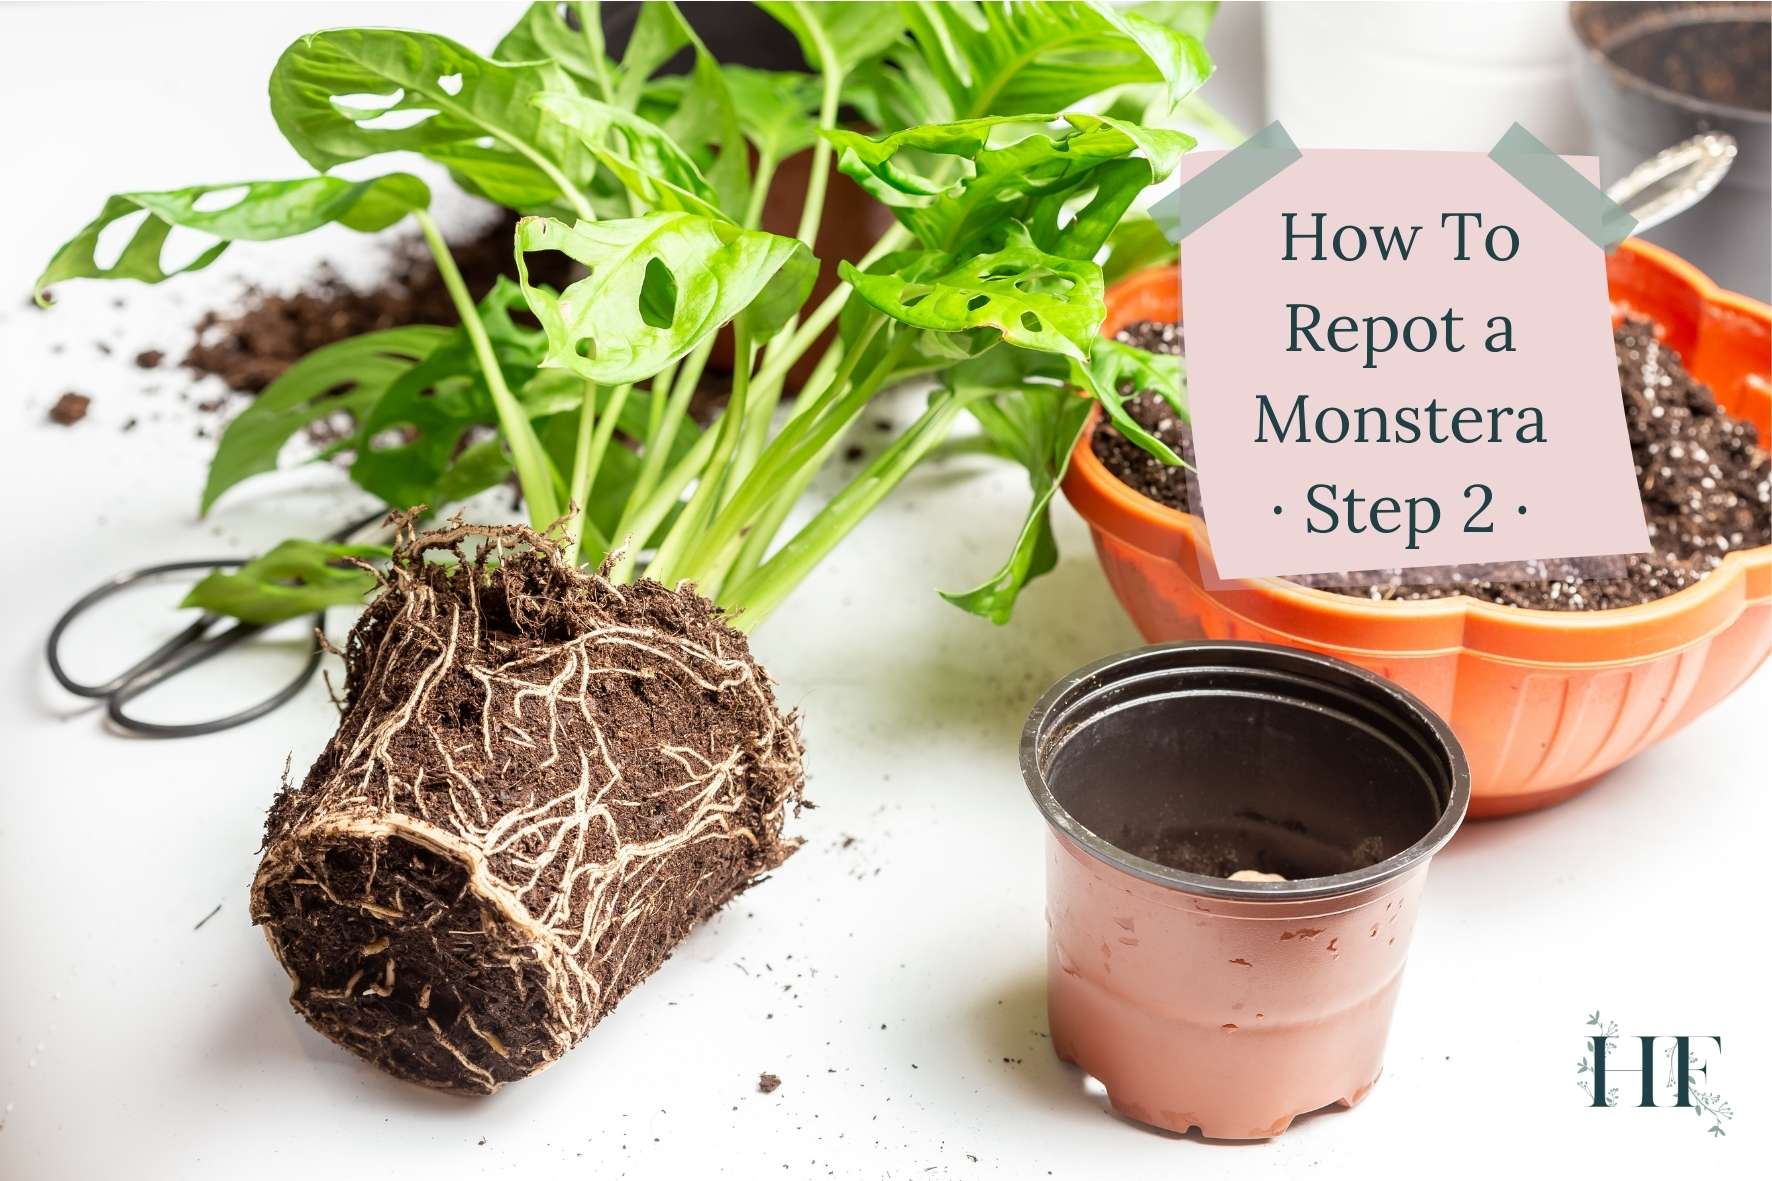
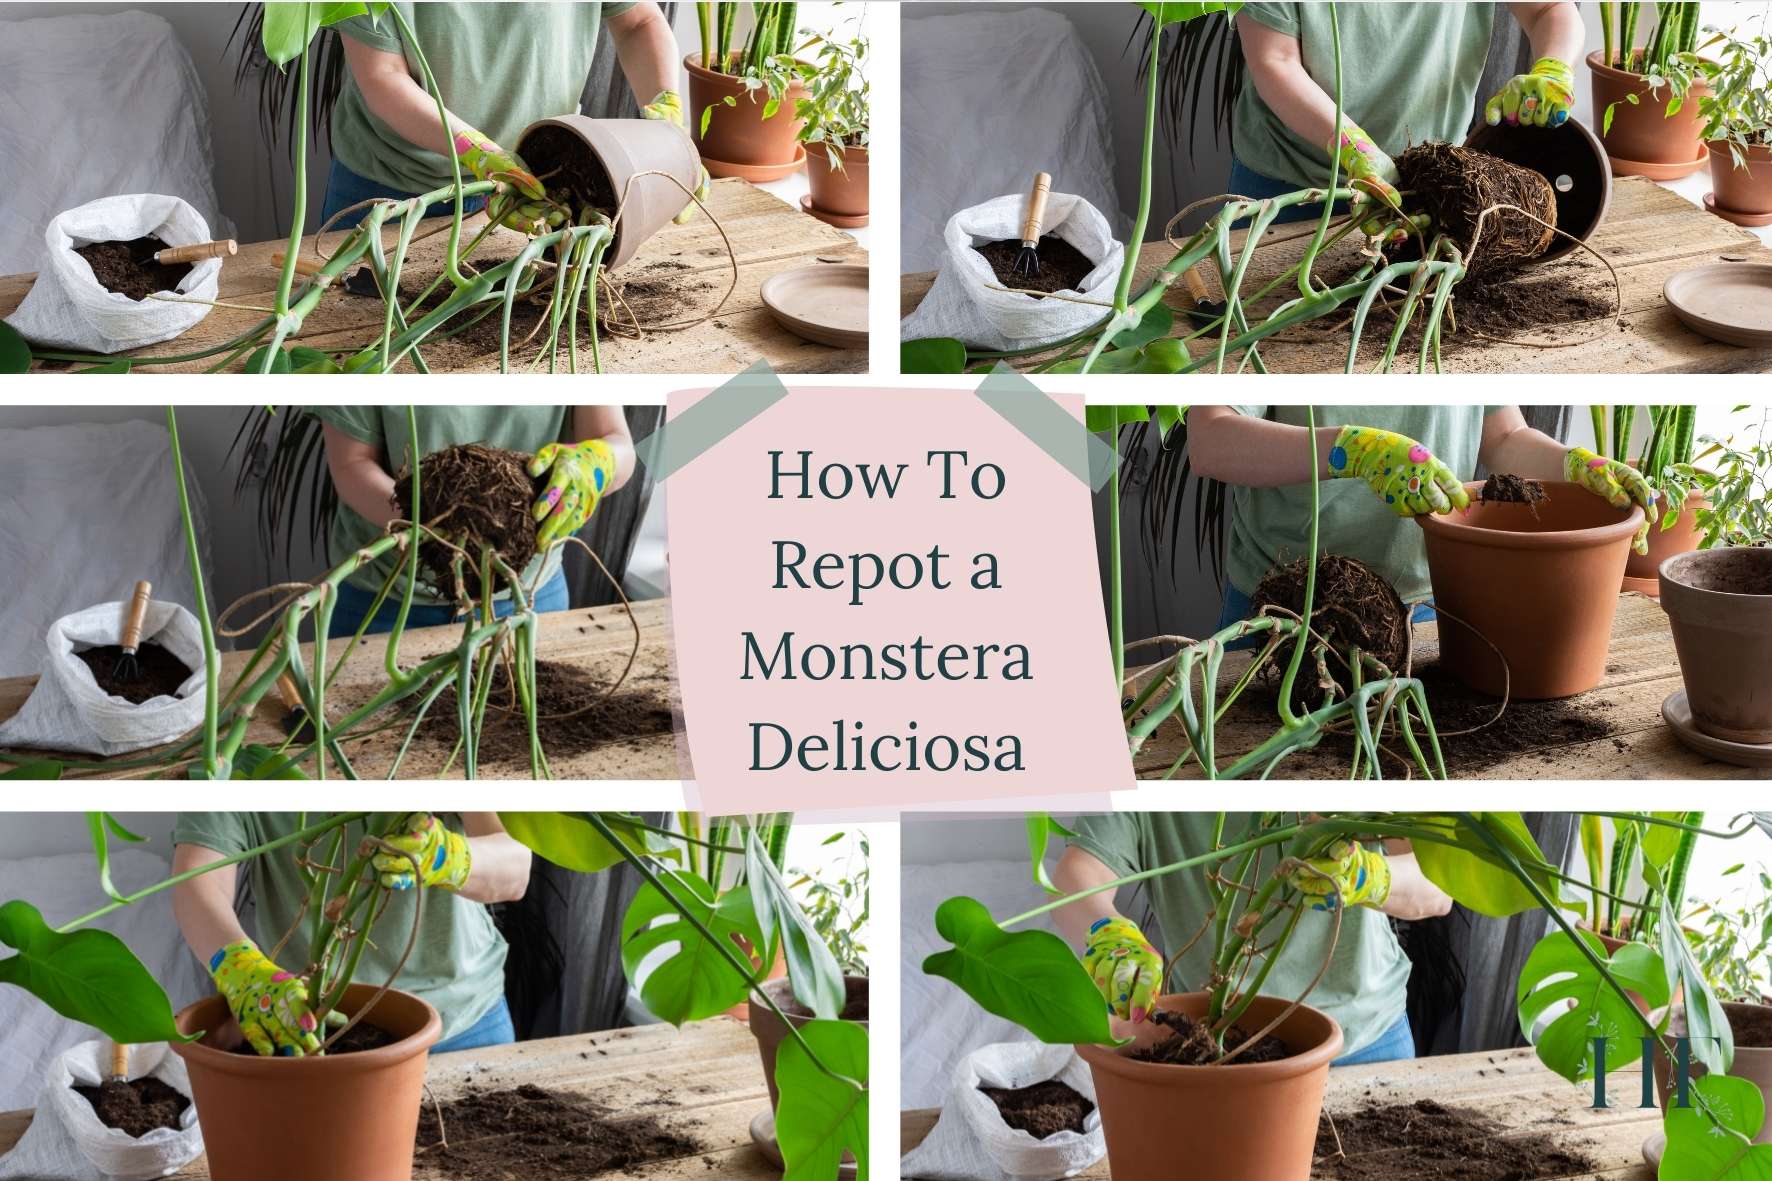
2) Remove the Monstera From Its Old Pot
Remove your Monstera carefully from its old pot, to avoid disturbing the roots. Turning the pot over whilst you gently coax the plant out usually works. Just avoid pulling the plant straight out of the pot since this can break the roots, stems, and leaves.
However, if your Monstera is root-bound, i.e., the roots are sticking from the drainage holes, you would want to cut the plastic pot away to release your Monstera.
If your monstera is very large, you might want to ask someone for help. When repotting large houseplants, it’s easier if one person holds the pot while the other supports the roots as they come out.
Insider Tip: Although some people decide to cut the longer aerial roots when repotting, I like to keep them as they are to avoid Monstera transplant shock.
If your monstera has a moss pole, also hold on to the pole as you remove the plant from the pot.
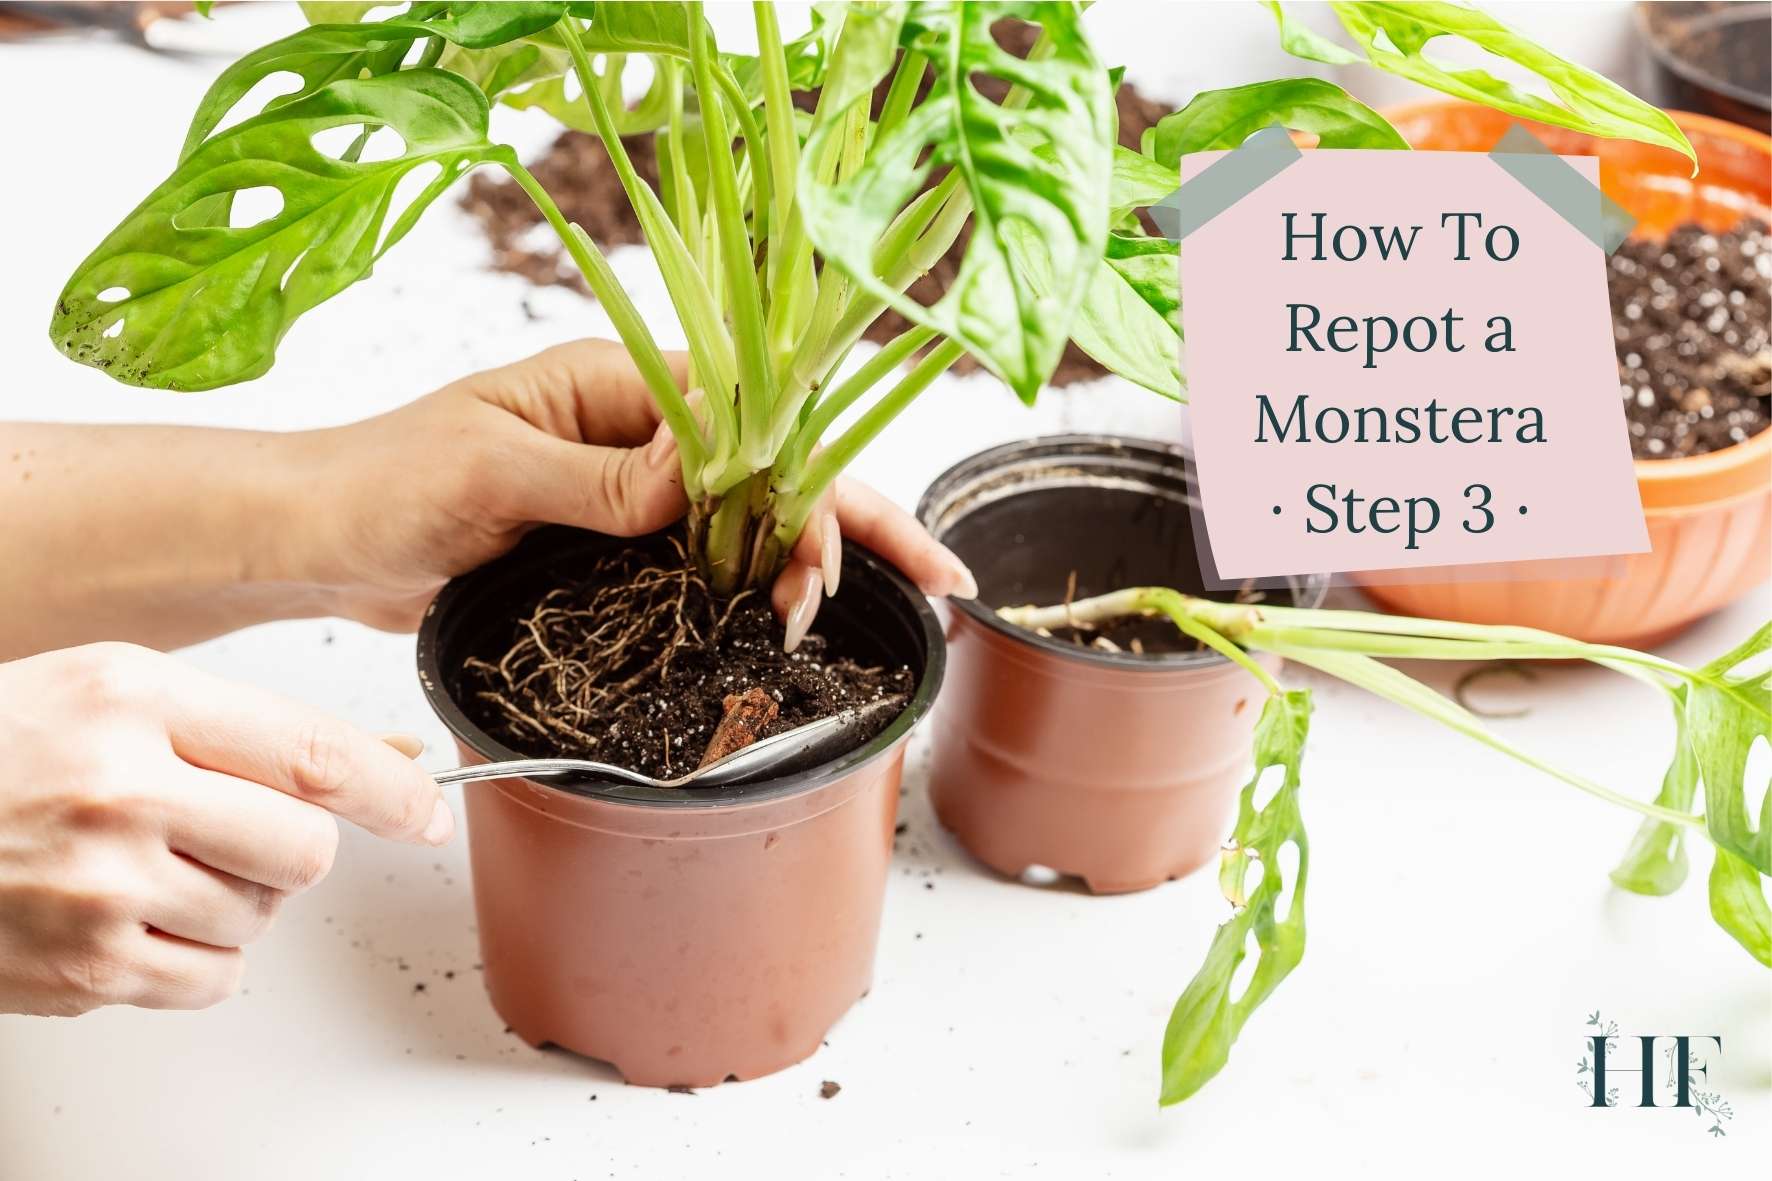
3) Put the Monstera Plant In the New Pot
Now, it’s time to place your Monstera into its new pot. Ensure that your plant is at the centre of the pot and its rootball is several inches below the pot’s rim.
If you have added a pole, arrange the plant around it. But, if the roots are too packed, you can carefully dig a hole large enough to insert the pole. Use twist ties to attach your Monstera’s stem to the stake if necessary.
If you are transplanting a Monstera with its old pole, carefully place the roots and pole into the pot. You might want to stake the pole into the pot first and then gently lower the roots down.
Then, fill up the rest of your pot with soil. Avoid packing the soil too much (i.e., pressing the soil down too much) since loosely packed soil makes it much easier for a Monstera’s roots to breathe.
You can also add a layer of potting soil on top as well, leaving about 2 inches free of soil at the top of the pot.
Read also: How to Choose the Best Pot for Monsteras & 10 Planter Ideas.
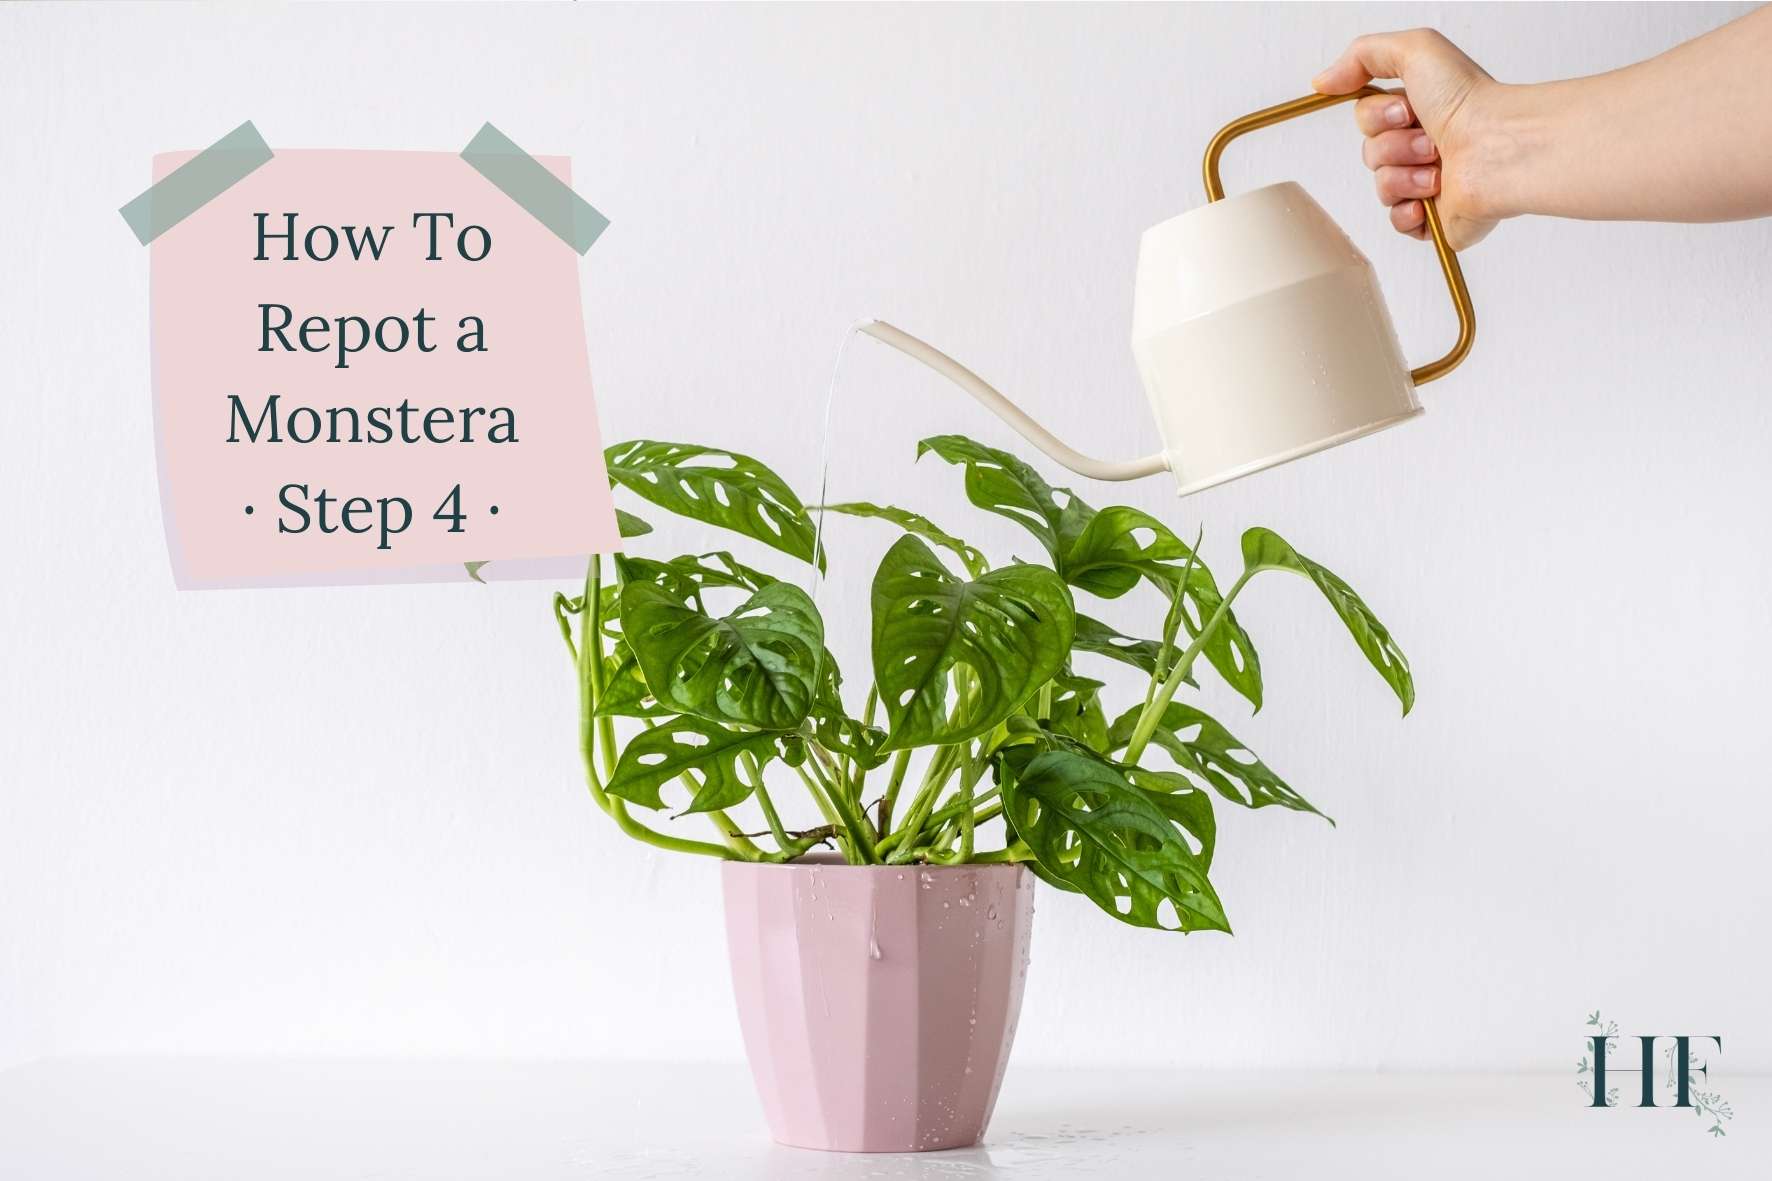
4) Water Thoroughly
Finally, water your newly potted Monstera until the water comes out into the drainage holes.
Rainwater and filtered water are the best types of water to use since they don’t contain harmful substances.
Avoid tap water (since it may contain chlorine, which may harm your plant) unless you live in an area with high-quality tap water. If you have hard water, the excess buildup of minerals can prevent the plant’s root system from absorbing enough oxygen.
If you only have access to tap water, leaving it to sit out overnight can allow some of the chlorine to evaporate before you use it.
Also, when watering, use lukewarm (room-temperature) water to avoid shocking your Monstera. Tropical plants may be accustomed to sudden downpours, but the rain is warm, unlike the chilled water from your tap.
After watering, the soil might sink a little, feel free to go ahead and add more potting mix (a.k.a. top dressing) if necessary.
Once you have allowed the water to drain for 10 to 15 minutes after watering and you have top-dressed your Monstera, you can place the plastic pot into the decorative planter.
Your Monstera will need some time to adjust to its new environment and it will probably experience transplant shock. A little droopiness is common. Continue reading to get familiar with the signs to watch out for.
5) Watch Out For Monstera Transplant Shock Signs
Repotted Monsteras can suffer from transplant shock. Although this is common and occurs with many houseplants, there are some ways to minimize your plant’s distress:
- Try not to disrupt the roots too much when you remove your Monstera from its old pot, moving as many of the roots intact as possible to the new pot.
- When you take the Monstera out of its pot, don’t remove or shake away any soil attached to the roots or injure the root ball.
- Do your best to keep the root ball moist while it is out of the pot. A dry root ball can lead to damage.
- Once your Monstera is settled in its new pot, water it thoroughly. Giving it plenty of water can help it settle into its new environment (pot and fresh soil) and reduce the risk of transplant shock.
Also, here are the signs of Monstera distress or transplant shock to watch out for:
- Drooping leaves.
- Browning leaves.
- Yellowing leaves.
If you notice these signs, care for your Monstera by giving it the right amount of water, light, nutrients, and humidity so that it is in the best conditions to recover.
Be patient, your Monstera will eventually recover on its own. Also, younger Monsteras tend to recover in a few weeks, while mature Monsteras may take months.
6) Follow a Repotting After Care Routine
Once you have placed your plant in its cache or decorative pot, you can put your Monstera back in its original location. Maintaining the same conditions lessens the chances of transplant shock, so keep the same environment.
After repotting your Monstera, make sure to continuously give it proper care and avoid fertilising for the next month. This can prevent the new roots from being burned.
Feel free to share your repotting journey and any tips that you may have found helpful when transplanting your Monstera! 🙂