Ever wondered if you can propagate a Monstera Deliciosa (a.k.a. the Swiss Cheese Plant) or any of the other varieties, for that matter?
In this blog post, I will cover the different methods that you can try. You don’t need to be an expert to propagate your Monstera and you can have some fun in the process.
In fact, if your Monstera plant is getting a bit wild, this is the perfect opportunity to give it a prune and grow some young Monsteras from its cuttings.
Monstera Propagation Questions
Can You Propagate Monstera?
There are at least 6 methods to propagate Monstera:
- Stem cuttings in soil.
- Stem cuttings in water.
- Seed.
- Air layering.
- Moss.
- Perlite.
However, Monstera is more commonly propagated by stem cuttings that can be rooted in soil or water since those cuttings can easily root.
Since the Swiss Cheese plant roots so easily, there’s no need for rooting hormones.
I will cover each method and go through their pros and cons.
Can You Propagate Monstera Without Node?
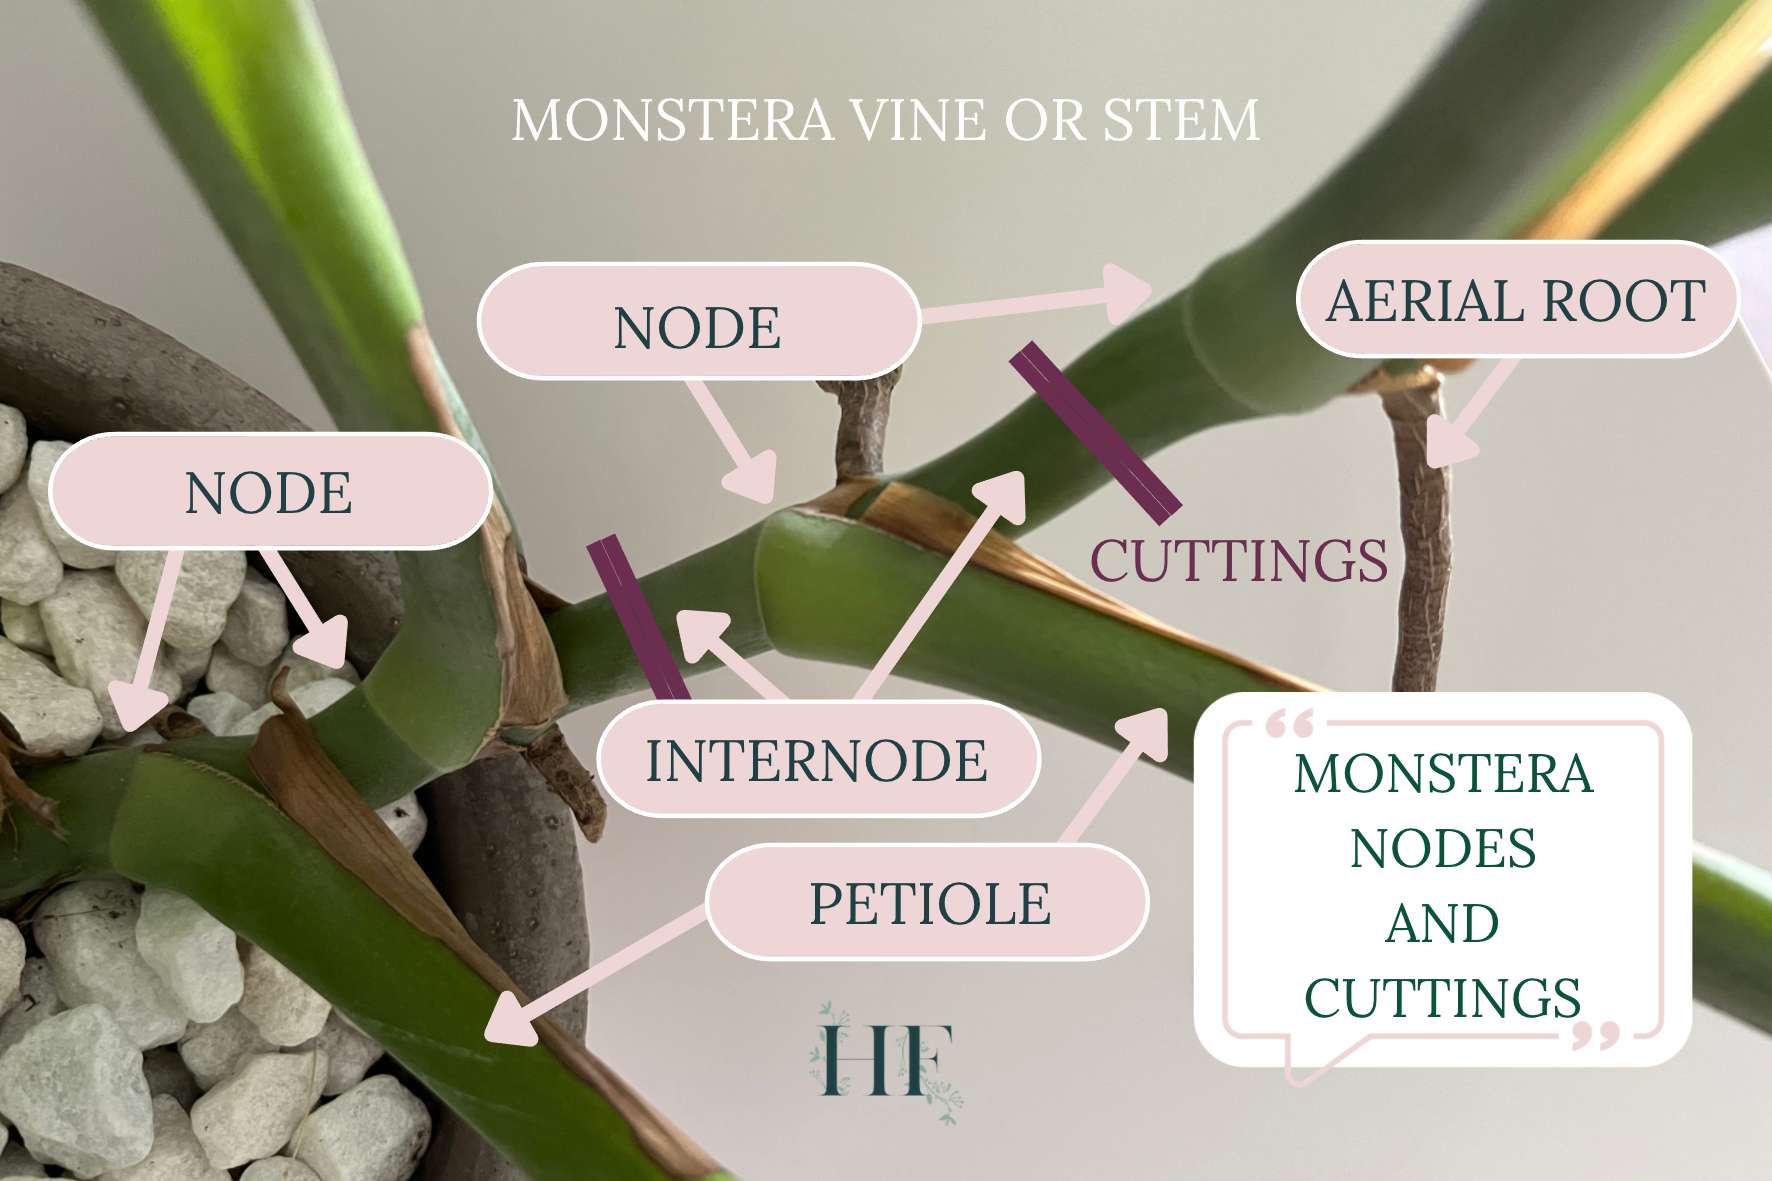
You cannot propagate a Monstera without a node i.e. it’s not possible to propagate a Monstera from a leaf cutting that has no node. The reason is that a node of a Monstera is the part of the plant where all new growth (leaves, stems, petioles, and aerial roots) originates i.e. where the growth cells are located.
This means that a Monstera without a node will never produce new stems or leaves because all the cells needed for this growth development are located in the node.
Read also: Monstera Nodes – All You Need to Know to Propagate.
Can You Propagate a Monstera Without an Aerial Root?
You can propagate a Monstera without an aerial root as long as it has a node. A cutting can include an aerial root and a couple of leaves. These features will make it easier for that cutting to grow into a plant but are not necessary.
Later on, I will explain how to propagate a Monstera from a stem cutting that only has one node.
Read also: Monstera Aerial Roots – 11 Frequent Asked Questions Answered.
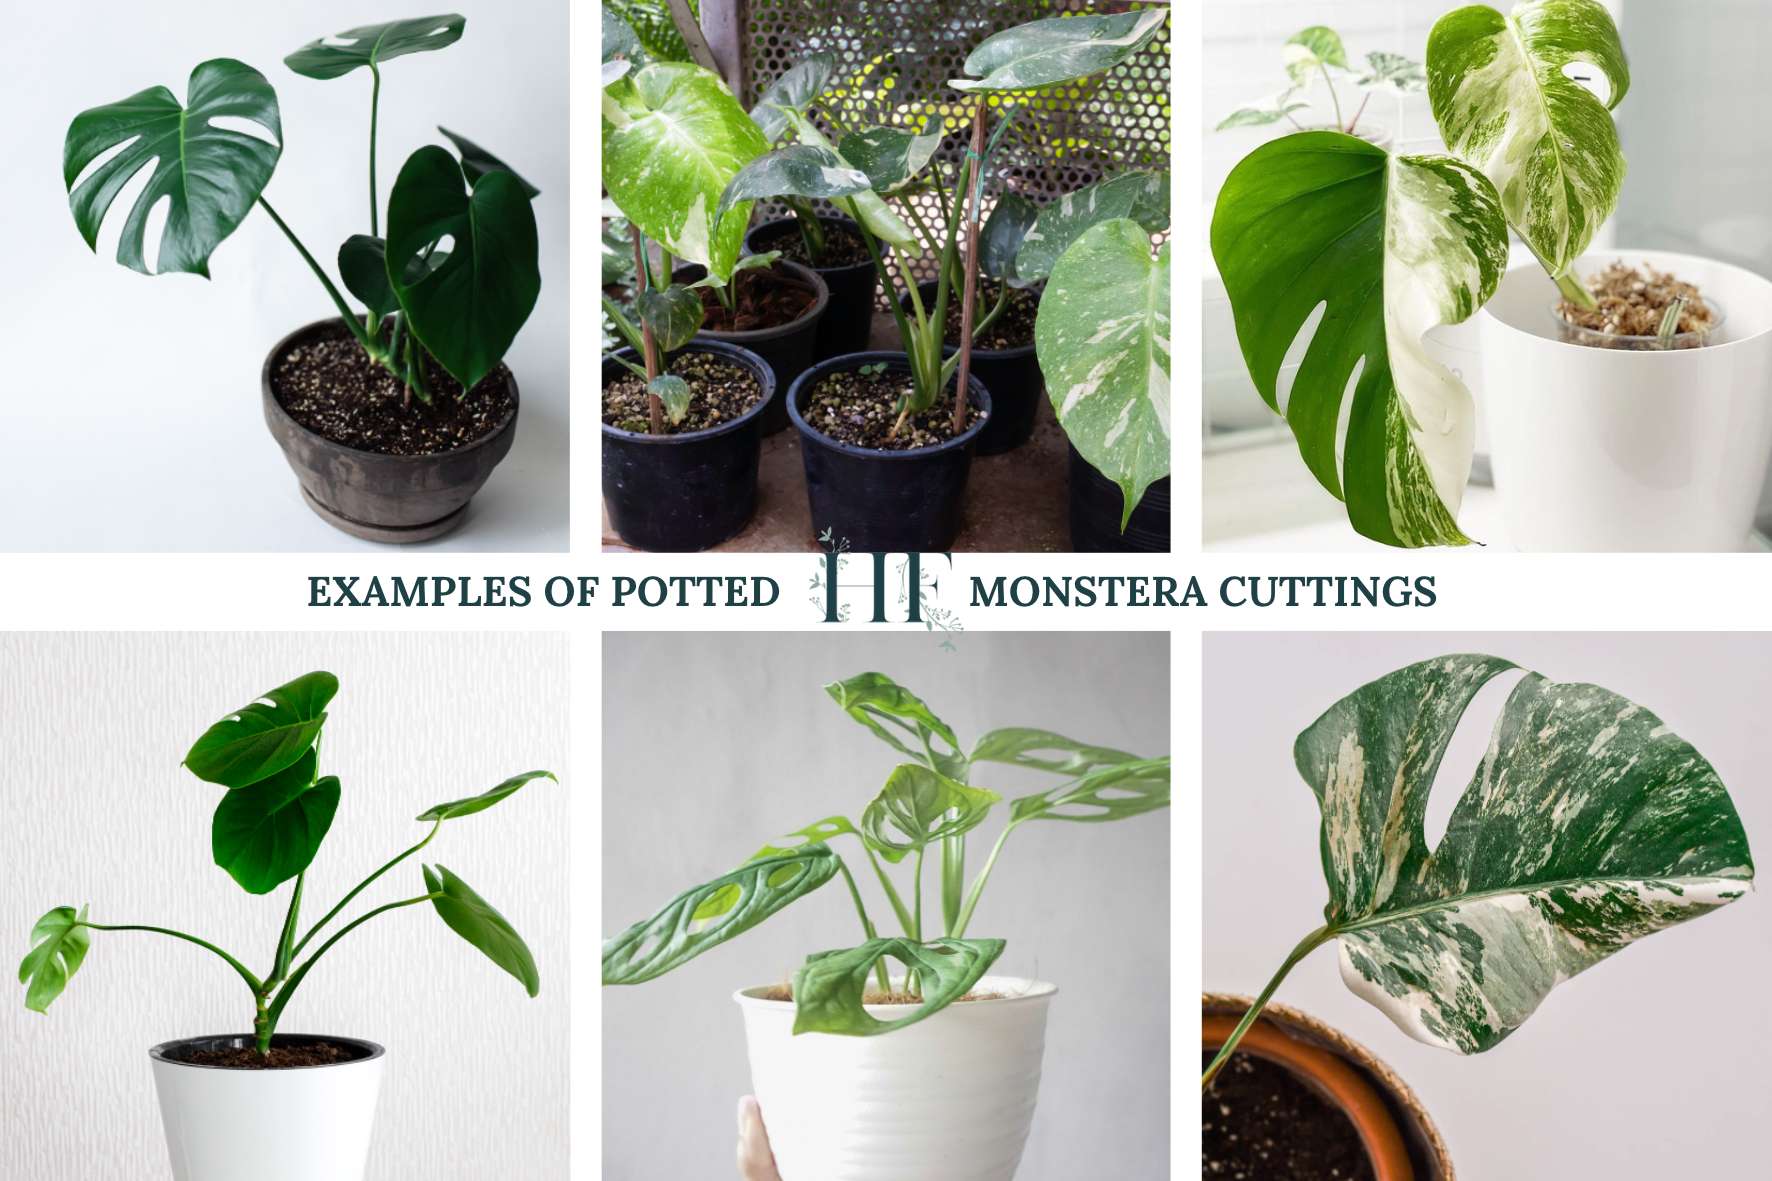
Can You Grow Monstera from Cuttings?
A Monstera cutting with a node is enough to grow a new Monstera plant. You will either let the cutting grow roots by placing it on a vase full of water or directly planting it in soil, using a planter.
As mentioned before, you can also grow a new Monstera plant from seeds (which I will cover, step by step, further down).
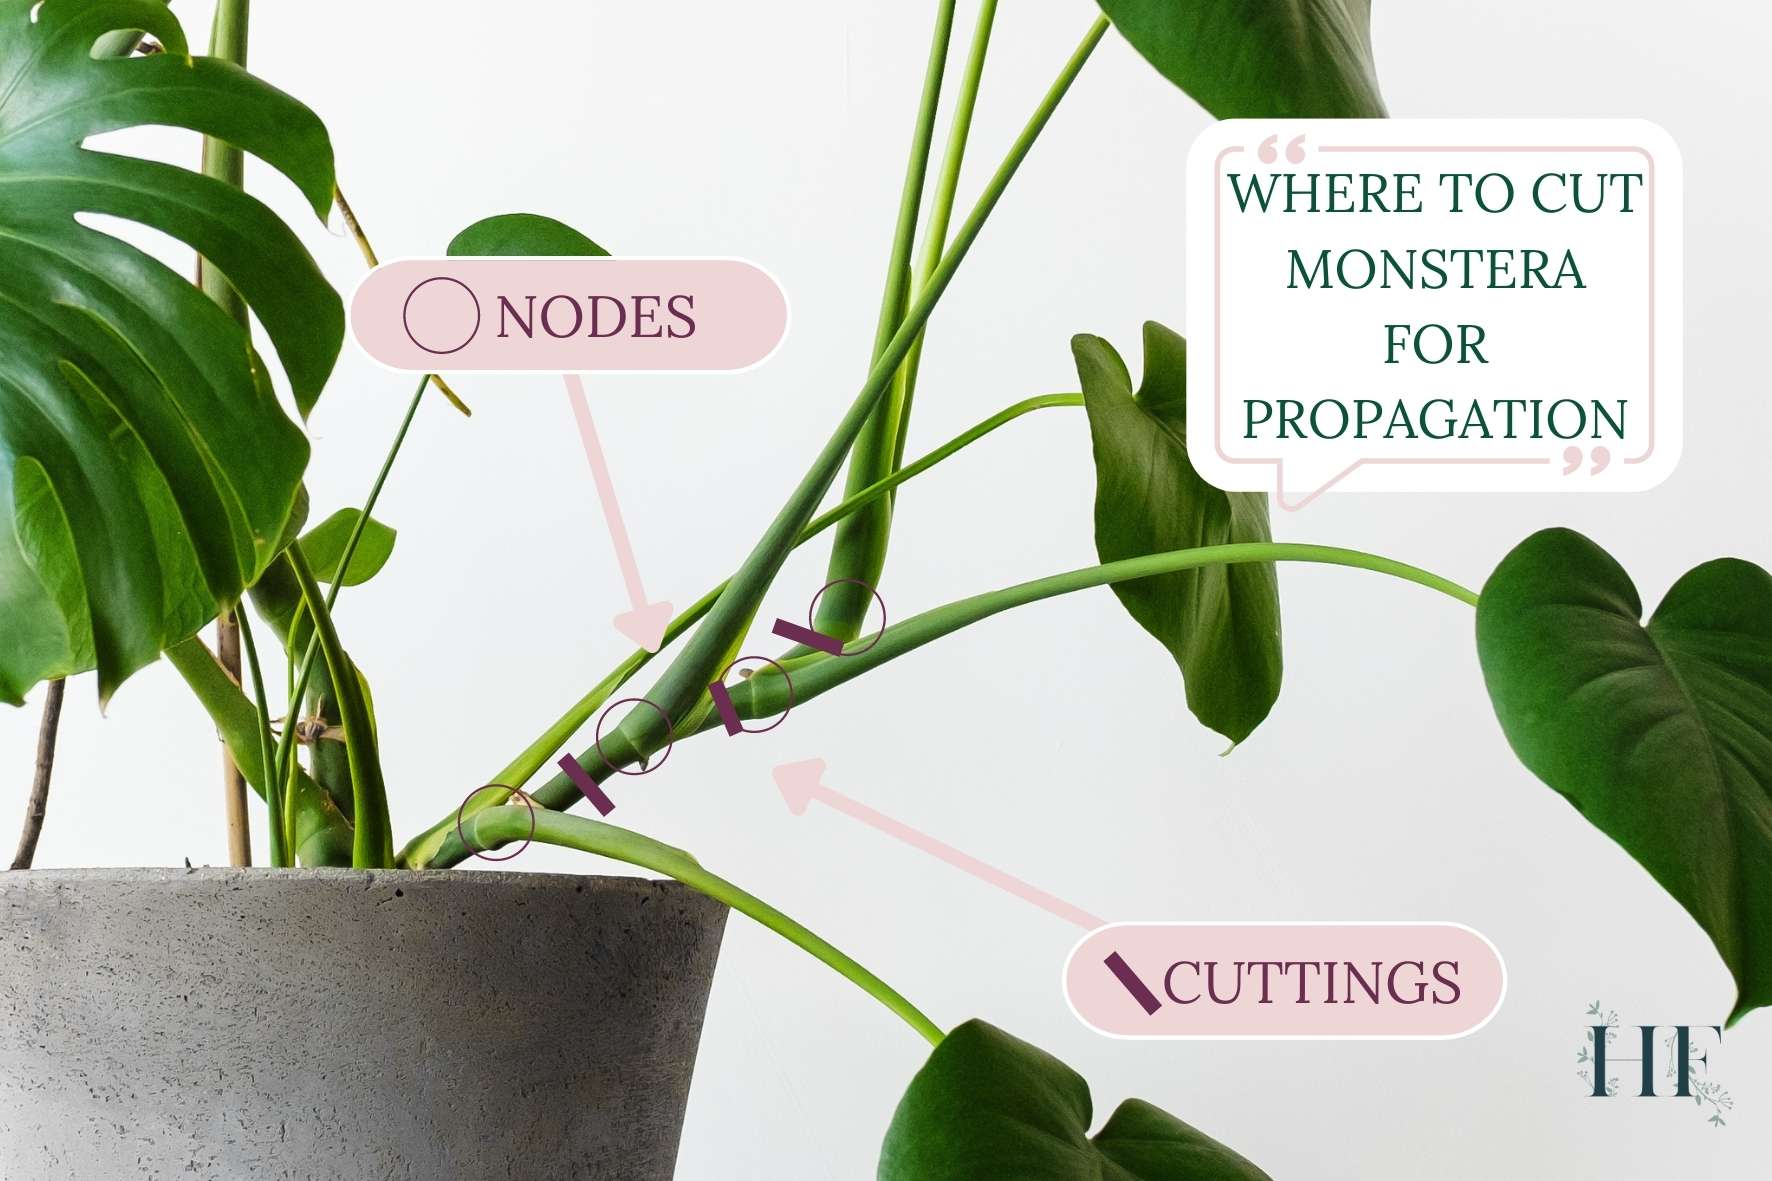
Where to Cut Monstera for Propagation?
Since the number one rule for propagating Monsteras is that you always need a node, you should cut a few inches below the node, keeping the node with the new cutting.
Apart from including a node, another thing to take into account is the number of leaves in the cutting. The number of leaves will speed the growth process of your new Monstera plant since they will perform photosynthesis, providing extra energy to the cutting.
For instance, you could take multiple small cuttings of just 1 or 2 leaves with one node, or a bigger cutting that includes 4 leaves and multiple nodes on one vine.
When preparing to take a cutting, you want to make sure you have a pair of sharp shears that are sanitized so you don’t contaminate the parent plant or the cuttings. I recommend these shears.
You can clean them with soap and water, or even rub a little bit of alcohol before using them.
What Monstera Cutting is Best for Propagating?
Here are the different types of Monstera cuttings you can take when propagating:
- Top Cutting: It just requires one snip since you are getting a cutting from the top of the plant, snipping a few inches below the node while leaving the internode attached to the parent plant. Top cuttings are great because they start growing again the fastest and the new leaves will not lose much maturity.
- Mid Cutting: After a top cutting, you can continue to take multiple cuttings from the same stem or vine. Each middle cut requires two snips, one above and one below. A mid-cutting will start growing a new stem from its node’s axillary bud, so it will be starting over in terms of leaf size and maturity.
- Stem cutting: Also known as “node cutting,” and “wet sticks.” It contains a node and no leaves. This type of cutting will take the longest to grow since there’s no leaf to assist development by providing extra energy to the plant via photosynthesis. It could take at least a month for the new bud to extrude from the node.
Depending on your propagating goals, you might prefer one type of cutting over another.
For example, if you want quicker growth and less margin of error, you might go for a top cutting that has 2 to 3 leaves, which also means 2-3 nodes. This cutting will also look like a fuller plant sooner. Plus, a larger cutting is more likely to contain an aerial root, which will help your cutting root faster.
However, if you want to split your cutting into single nodes to maximize the number of plants, you could wait until all the nodes have their own aerial roots so you can give the cuttings a better chance to survive.
Insider Tip: For an unrooted cutting, you need to balance energy production and consumption. Without water from the roots, a cutting with many leaves may use more energy to sustain them than it can produce. In that case, the leaves will turn yellow and die off one by one until a balance is reached. This is especially true for mature cuttings with very large leaves.
What Are the Stages of Propagation for Monstera Plants?
When propagating your Monstera, you might want to know the stages the cutting will go through so you know what to expect.
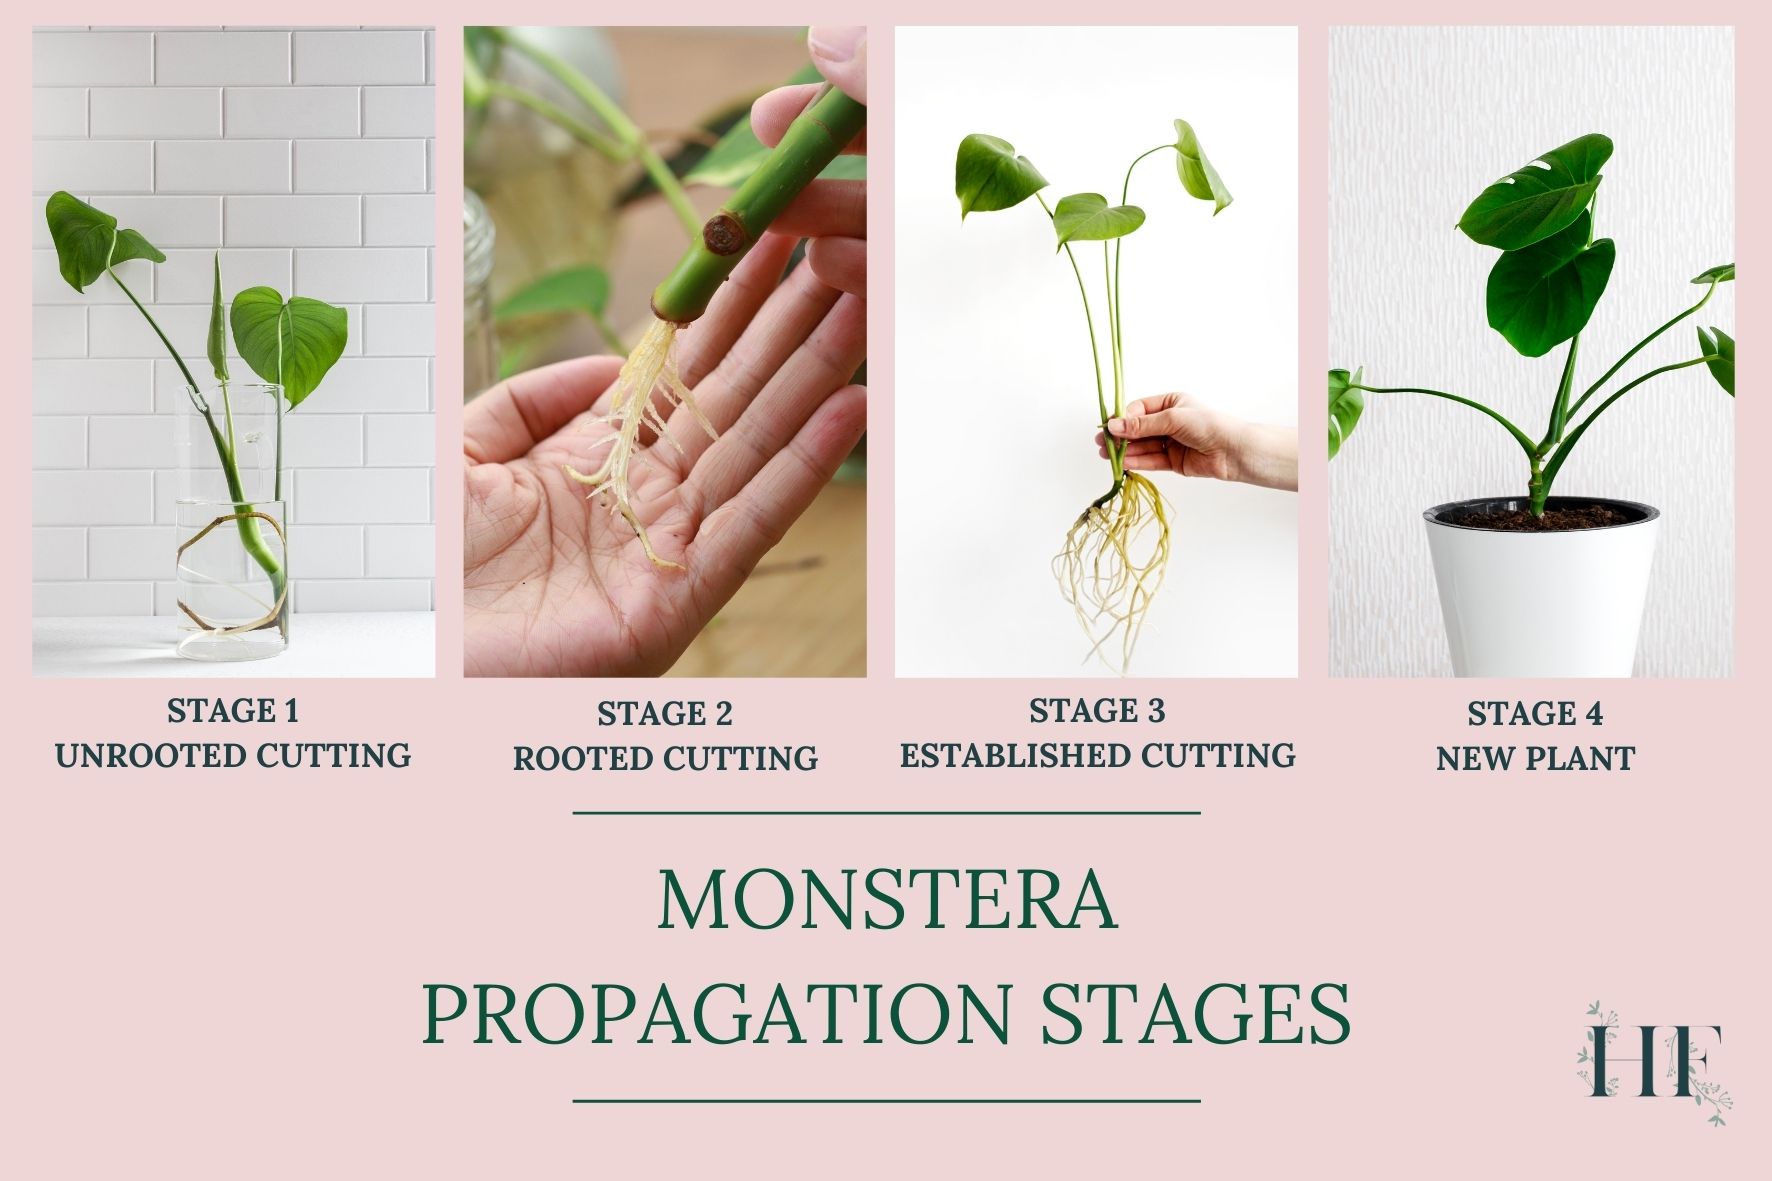
There are 4 stages when it comes to propagating Monsteras:
Stage 1 – Unrooted Cutting
An unrooted cutting is a freshly cut piece of a Monstera plant.
When you start propagating, your cutting will not have any soil roots yet, although it may have aerial roots.
Insider Note: Until the Monstera cutting grows roots, the plant is missing a vital piece of the photosynthesis equation: water. Without an external source of water, your plant cannot feed itself for long, and will eventually turn yellow.
In order for your cutting to survive, the next step is to encourage root growth by putting the cutting in water or soil.
Stage 2 – Rooted Cutting
Once it grows a full set of roots, you have a rooted Monstera cutting.
After 3 to 5 weeks, the Monstera cutting should be growing roots. The first one that grows will be a single white, fuzzy root, coming out of the stem.
Once it’s long enough (around 1 inch long), it will start to produce little feeder roots coming out the sides. These fuzzy roots will absorb moisture for your Monstera.
Stage 3 – Established Cutting
When the main roots and feeder roots grow several inches long, the Monstera cutting is ready to be planted in the final medium.
The cutting becomes established once the roots have adjusted to their new medium (especially if propagated in water) and started to grow again.
Did you know? When transferring a cutting that has rooted in water into soil, some of the roots will die. As a rule of thumb, expect 1/3 of the roots to die in transition.
Before planting your cutting, make sure that it has enough roots to sustain itself even if it loses a few.
Stage 4 – New Plant
Finally, your Monstera starts producing new leaves.
The fact that its producing new growth indicates that is getting enough water and thriving as a plant.
This can happen before the cutting is established in its final medium if you keep it rooting for a long time in water.
How Long Does Propagating a Monstera Take?
The Monstera propagation process can take between 1.5 to 4 months. How long it takes to propagate a Monstera will depend on the health of the cutting, propagation method and when it was propagated.
Here are some examples of the time it can take from taking the cutting until the unfurling of the first new leaf:
- Top cutting with aerial root: Around 1 month and a half.
- Mid cutting with aerial root: Around 3 months.
- Stem cutting with aerial root: Around 4 months.
Insider Tip: Some cuttings will start rooting straight away and throw out new leaves soon after. Others can go through a dormant period. Often, Spring will kick start previously dormant cuttings.
When to Propagate Monstera?
To ensure your Monstera propagation is successful, propagate at the right time of year.
Spring is the best time of year to take cuttings from a Monstera to propagate. This is because the plant is coming out of dormancy from the colder months (autumn and winter) and entering its strongest growing period.
You can still have success propagating in the early Autumn, but the process is likely to take much longer. Also, you may need to supplement lighting using artificial lights to promote its growth.
Can Monstera Be Propagated in Water?
You can propagate a Monstera cutting with a node either in water or soil.
Both ways produce rooted cuttings, so keep that in mind when deciding which method will work best for you.
The water propagation method works just as well as soil and has the advantage of being easier to check progress. I will be going through the pros and cons of both methods further down.
How Long Does it Take for a Monstera Cutting to Root in Water?
Usually, a Monstera cutting should be growing roots after 3 to 5 weeks.
Some cuttings start their root development after one or two weeks, but it can take longer in other cases.
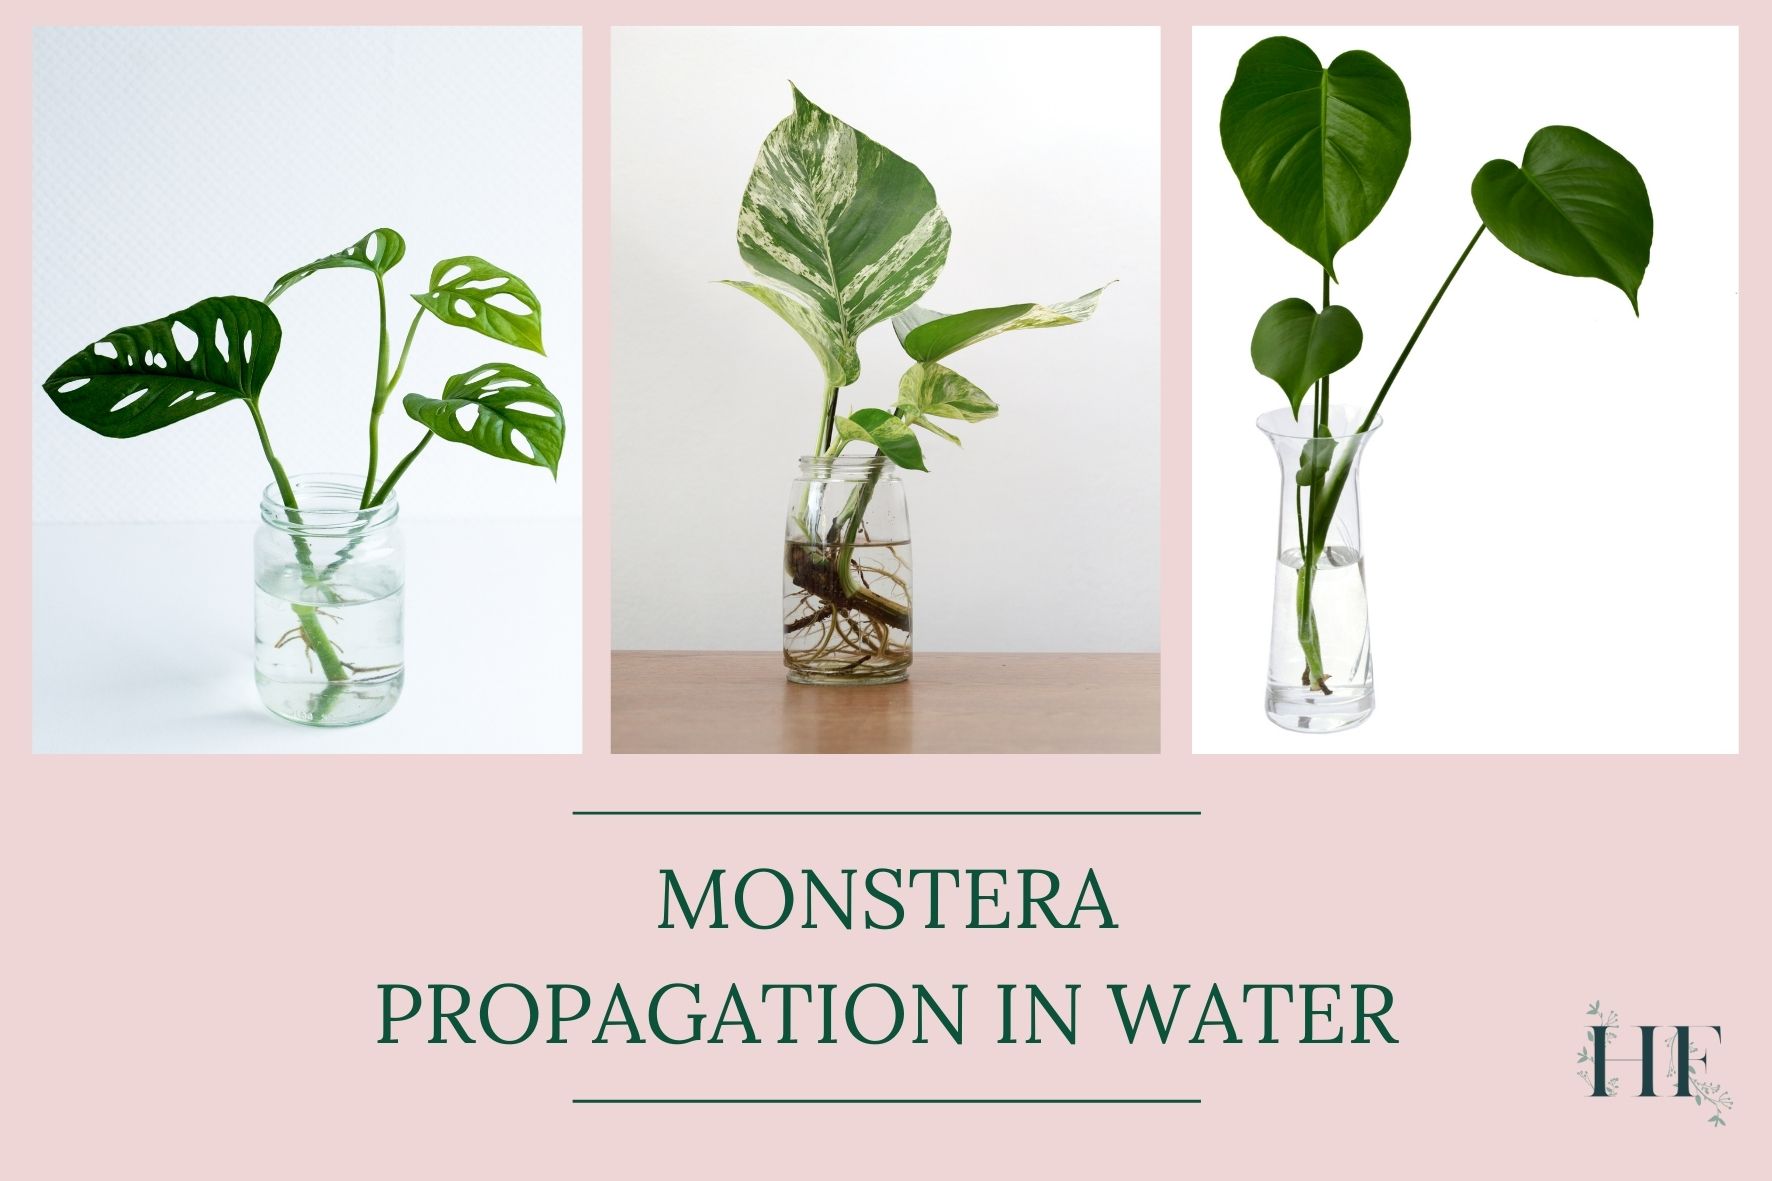
Monstera Propagation in Water
Before getting into how to propagate your Monstera cutting in water, let’s take a look at the pros and cons of this method:
Pros:
- Keeping the cutting in fresh, high-quality water and giving it plenty of sunlight is enough to keep it alive and growing.
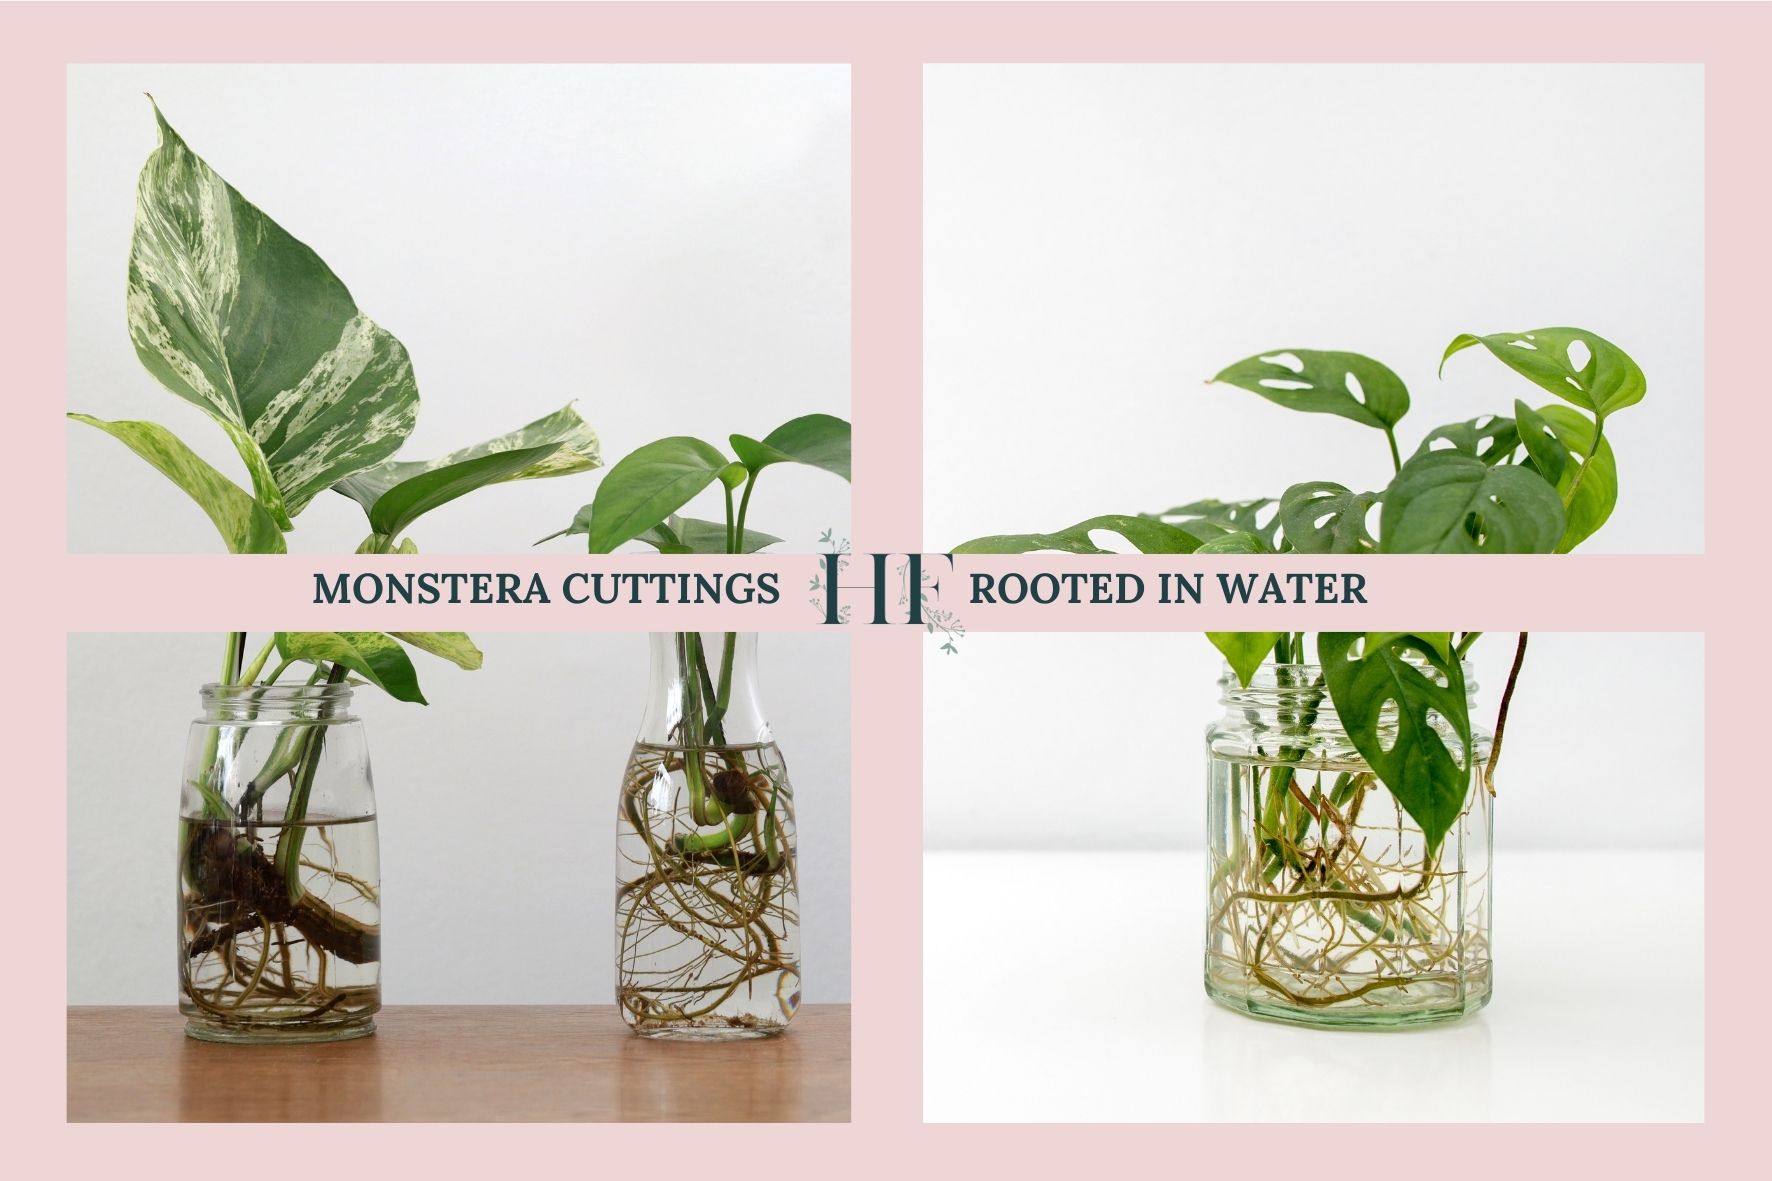
- When using a clear vase, the roots are visible as they grow, so it is much easier to track each cutting’s progress as it develops and check the cuttings for signs of rot.
- It’s very easy to maintain consistent moisture around the roots.
- There’s no organic matter in the medium (a.k.a. the water) to introduce disease.
- You won’t damage the roots when it’s time to remove them from the water.
- Also, roots grow quickly.
Cons:
- Roots that grow in water are different from those that grow in soil. This means water roots don’t absorb nutrients and oxygen the same way that soil roots do. This makes the transition from their water habitat to soil more difficult.
- There’s also the possibility of the cuttings being shocked when they are eventually transplanted. You might lose some cuttings during the process.
- Also, there’s the risk of Monstera node rot (i.e. Monstera node turning black). To reduce the chances of stem rot, try to keep only the aerial roots in water and suspend the stem out of water.
- There’s no airflow around the roots.
- The only source of oxygen is what is dissolved in water. You could add fish tank air stones to increase water oxygen levels.
- You need to replace the water every few days and rinse the roots.
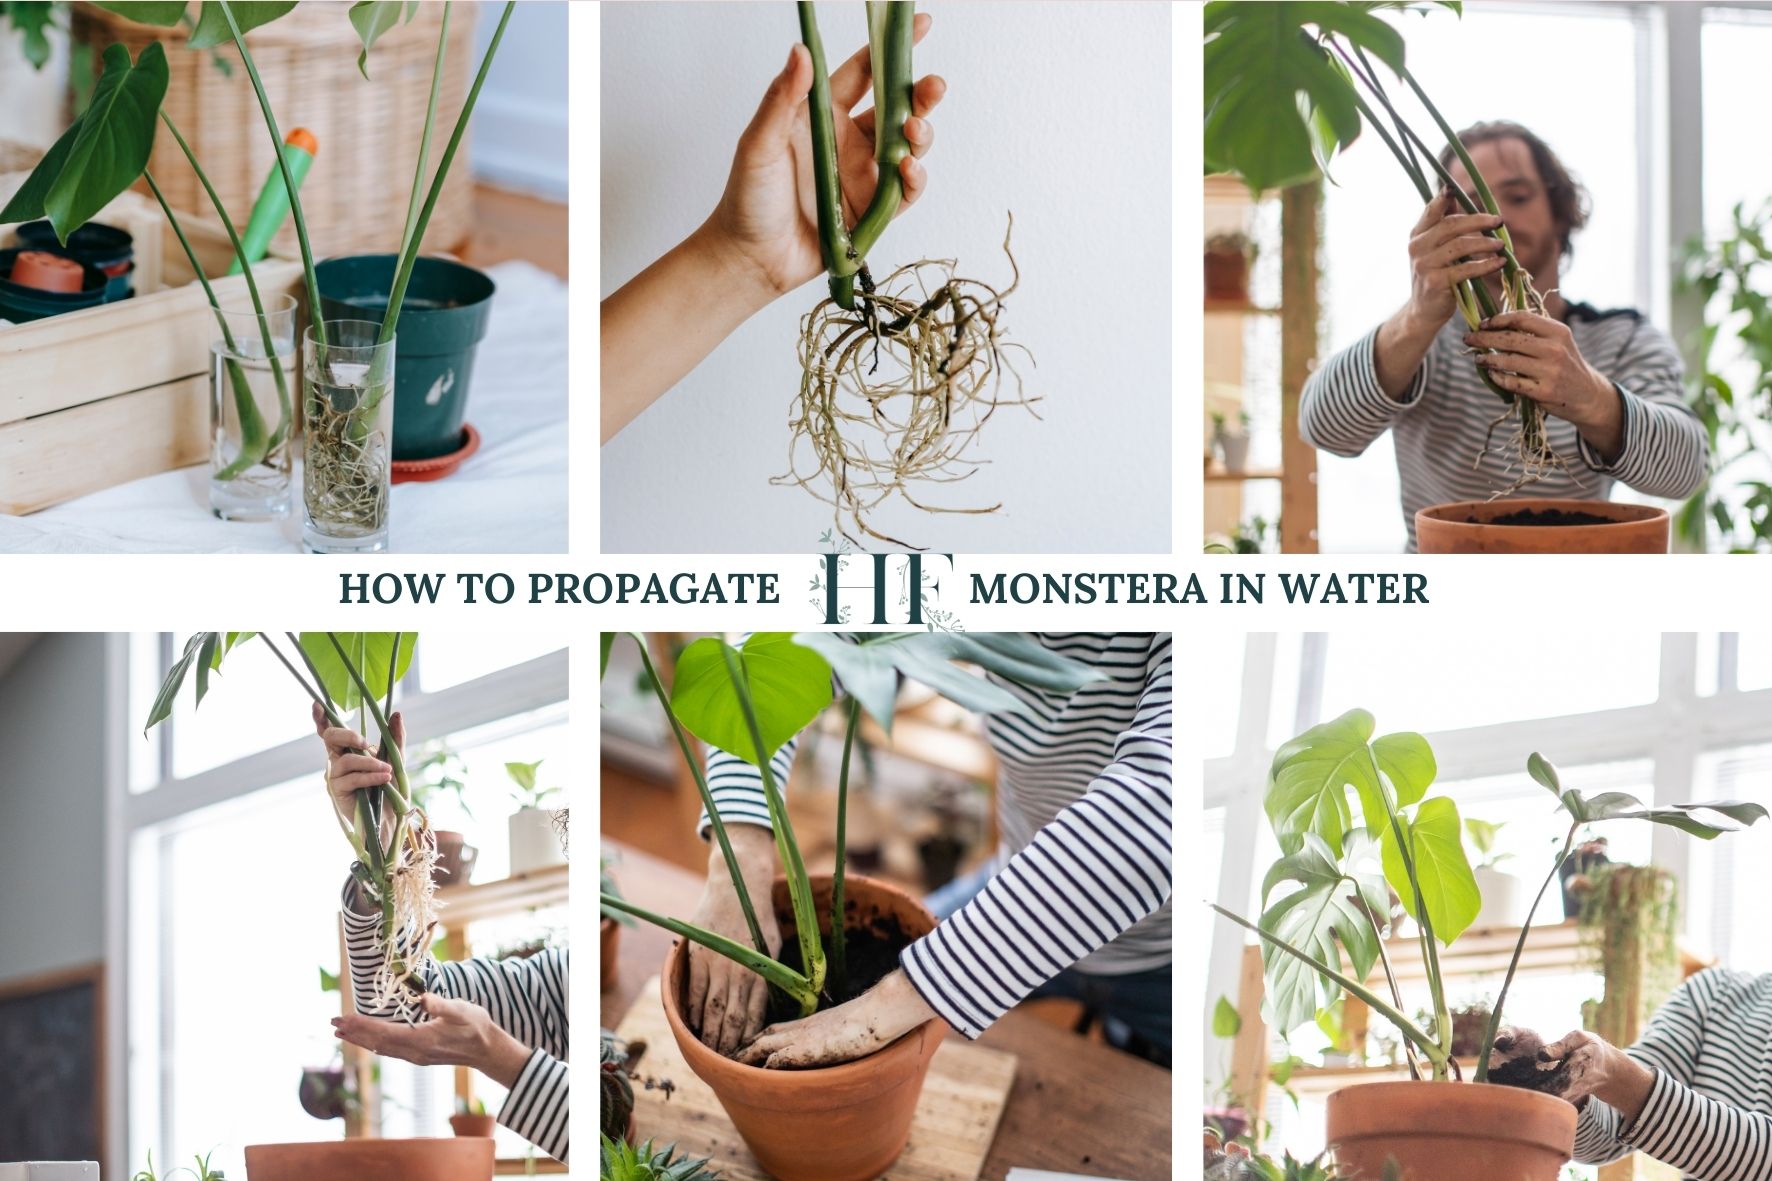
How to Propagate Monstera in Water (Step by Step)
Now that you have deeper clarity on what propagation in water looks like for Monstera plants, it’s time to take action!
What you will need:
- A pair of shears: Already sanitized or washed with soap. This will avoid any cross-contamination that can potentially infect your plant with any diseases the shears might be carrying.
- A vase: Tall and wide enough to accommodate the size of the cutting. I would recommend a vase per cutting so it has enough room once the cutting starts to grow roots.
- Water: Rainwater or filtered water are the best options (i.e., non-chlorinated water). Avoid tap water unless you live in an area with high-quality tap water.
- Rooting hormone: This is optional. For water propagation, you can choose a gel format rooting hormone since it’s more appropriate for this medium.
1) Decide Where to Cut Your Monstera that Includes a Node
Choose where you are going to take a cutting from and make sure that it includes a node.
This means that you will decide on what type of cutting you want – not only the number of nodes, leaves and aerial roots; but also if it’s a top, mid or stem cutting.
For the fastest results that also guarantee a higher rate of success, many plant experts recommend choosing a stem with a few nodes, an aerial root, and 2 to 3 healthy leaves.
Reminder: Monstera nodes are bulging: this part of the stem may be thicker than the internodes, and have light green circular rings, making them easy to identify from the rest of the stem.
If there’s a leaf stem splitting off from the main stem (an ‘intersection’ of two stems), there will always be a node just below that growth. You can also find a node where an aerial root is growing.
If you are still a bit unsure of what a node is and how to locate one, I wrote an entire blog post dedicated to this subject. For more information on Monstera nodes, click here.
2) Make the Cut a Few Inches Below the Node
Using a pair of clean and sharp shears, make a cutting a few inches below the node. You want to make sure to make the cut in the middle of the internode (i.e. between the two nodes – the one that stays in the plant and the one that goes with the cutting).
Cut the stem cleanly, without causing any crushing damage, to keep the tissue healthy. I recommend these shears.
Also, make sure to cut at a 45-degree angle to maximize the surface area, allowing for greater water uptake and faster root growth.
Once you chop your cutting, you may notice the exposed tissue turning a reddish-brown colour within a few minutes. Don’t worry, this is just a reaction to being in contact with the air.
As it is exposed to air, the end of the cutting will naturally callous, creating a barrier to protect the plant from rot and infection.
After the cut end is dry to the touch, you will be ready to root your Monstera cutting.
3) Treat the Cut with a Rooting Hormone (Optional Step)
If you wish, you can apply rooting hormone to the cutting. This will encourage roots growth and prevent fungus or rot (only if the hormone contains a fungicide).
Did you know? Monsteras naturally produce this hormone, which signals to the plant that it should grow roots, so it’s an optional step.
The rooting hormone comes in powder (ideally for dry mediums like soil, since it will wash off in a liquid) and gel format (works in both wet and dry mediums). For water propagation, you can choose a gel format rooting hormone, I recommend Clonex rooting gel.
You can put a small amount of hormone into a separate container and then dip the end of the cutting into the hormone.
4) Position the Cutting into a Vase and Add Fresh Water
After taking a cutting and applying the rooting hormone (optional), let it air dry for about 10 minutes. This will allow it to callous.
Then, place the cutting gently in a vase, making sure it stays upright, and fill with water until the aerial roots and end of the cutting are completely covered. Try to make sure the cutting is suspended and not squished into the side or bottom of the vase, as this increases the chance of rot.
Remember: Rainwater or filtered water are the best types of water to use since they don’t contain chlorine or other substances that can damage the cutting.
Next, place the vase in an area with bright, indirect light (avoid direct sunlight). The sunnier the location, i.e. the longer the cutting receives light, the quicker the cutting will root.
Ideally, you want to change the water at least once a week to keep the cutting healthy and in optimal growing conditions.
When changing water, you can also gently rinse off the roots in case there’s any rotting plant matter hanging around.
Insider Tip: The best type of vase to keep a Monstera cutting is a wide enough cylinder vase that is made of clear glass. Applicable for both Monstera Deliciosa cuttings and Monstera Adansonii cuttings.
I like to use a long cylinder glass vase that has a wide enough diameter to accommodate the cutting (with its aerial roots), allowing the space for the new roots to grow and also keeping the stem upright.
Also, having a wide mouth will help increase the airflow so that the water the cutting is in doesn’t become stagnant. Plus, it will keep from damaging the roots when you are ready to remove it from its glass container and plant it in soil.
5) Keep Roots Clean and Provide Them with Bright, Indirect Light Whilst They Grow
Now it’s time to be patient and let your Monstera cutting grow roots.
On average, a Monstera cutting should be growing roots after 3 to 5 weeks of being propagated.
Meantime, focus on changing the water and washing the roots every week. If necessary, feel free to snip off areas that look unhealthy.
As long as there are several healthy-looking roots, you can cut off roots that look like they are rotting (looking dark brown or black in colour and feeling mushy or slimy in texture).
Also, make sure that your cutting is getting bright, indirect light for most of the day. Direct sunlight can burn both leaves and roots, quickly killing these delicate cuttings.
Did you know? Because of the water propagation method, a Monstera cutting will develop what’s called water roots, which are white and opaque.
6) Decide If It’s Time to Move Your Monstera Cutting From Water to Soil
When should you move your Monstera from water to soil?
When there is a nice cluster of thick white roots filling up the vase, the Monstera cutting is ready to be planted in soil. As long as you have around 5 roots that are several inches long, you can plant your Monstera cutting.
Also, take into account that a tall cutting with several leaves should have more roots to support it than a smaller cutting with only a single leaf.
Usually, it can take about 6 weeks for roots to develop on your Monstera cutting before you move it into the soil. You can also wait until 5 or more roots have grown and they are at least 6 inches long.
If unsure, you can wait between 2 to 3 months to ensure a solid root system has formed for a better chance of survival.
Did you know? The Monstera cutting can remain in the water indefinitely. It can live in water for many months (if not years) as long as you change the water regularly, clean the roots and move the cutting into a vase as it grows.
The fact that Monstera cuttings can live in water for a long while gives you time to decide when it’s best to transplant the cutting into soil.
If you are interested in a long-term water arrangement for your Monstera cutting, check this blog post about Monsteras living in water.
7) Plant Your Rooted Monstera Cutting in Soil
High-quality soil and a correctly sized pot will make all the difference when it comes to your Monstera cutting surviving and thriving as a new plant.
What you will need:
- Soil mix: Since Monsteras are an aroid plant, they need light, airy and breathable soil. Monstera plants do best in a light, chunky soil mix with a pH of 5.5 to 7.
- The best way to achieve that type of medium is to use a mixture of indoor potting soil, a handful of orchid bark chips, loose coco coir, perlite or even some organic matter like worm castings. Check my Which Type of Soil Is Best for Monstera? for a Monstera repotting soil recipe.
- Alternatively, you can also add a ready-to-go mix of coco coir and perlite into the houseplant compost.
- There’s also a Monstera specific potting soil available on Amazon.
- A pot: Choose a pot that isn’t too big. So find a pot that’s a couple of inches wider than the cluster of roots. Larger pots hold a lot of soil, which in turn retains a lot of moisture, which increases the chances of overwatering and root rot. I prefer a clear plastic pot with several drainage holes, which I then put inside a decorative cachepot. Check my How to Choose the Best Pot for Monsteras & 10 Planter Ideas blog post for more info.
Here’s how to plant a rooted Monstera cutting in soil:
- Start by filling the bottom of the pot with a little bit of soil (if you have different mediums, have the mixture ready beforehand).
- Then gently place the rooted cutting in the middle of the pot.
- Lightly fill in soil around the cutting until all the nodes and roots are covered with soil.
- Depending on the size of the cutting, you could also choose to add a moss pole to the pot so the Monstera has something to climb onto as it grows.
- Give the cutting plenty of water (until it runs out of the drainage holes), and then add more soil if needed.
- Place the plant in a bright location but not in direct sunlight.
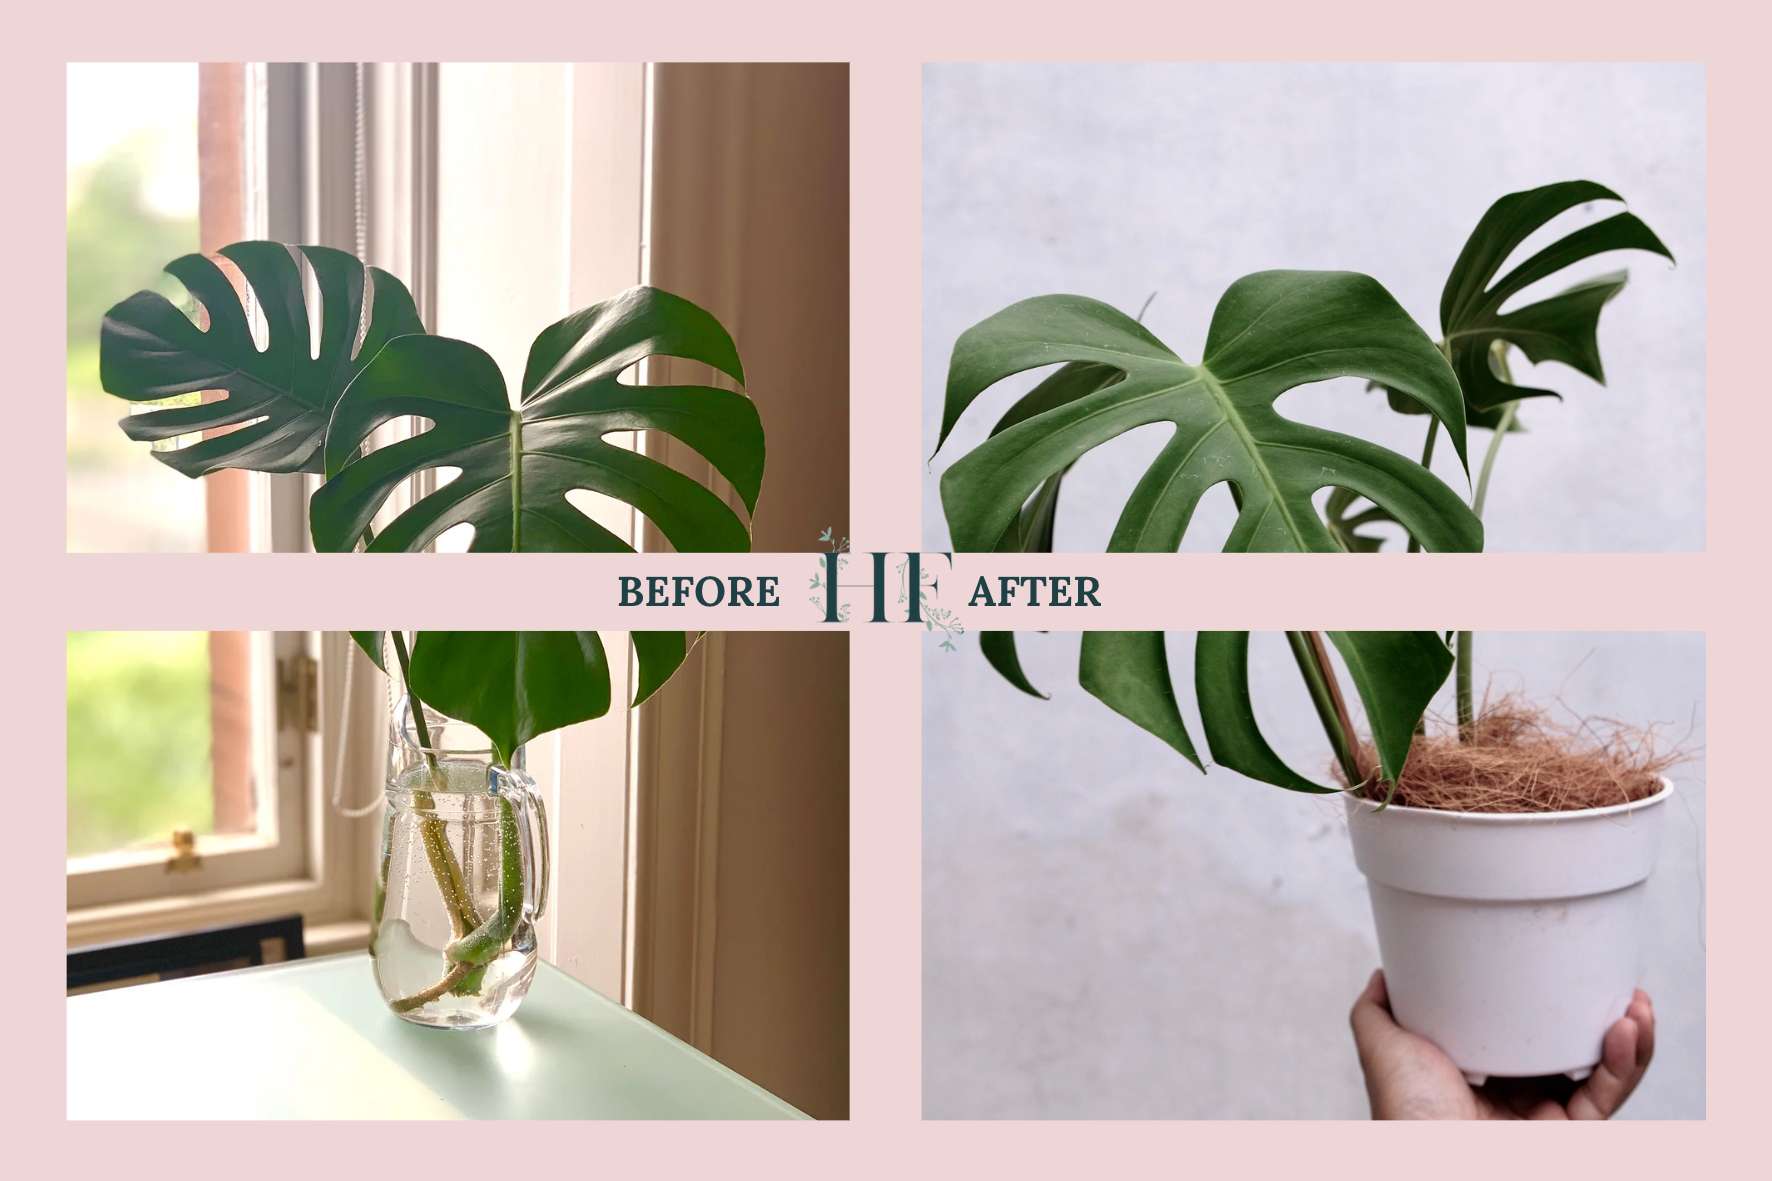
8) Monitor Your New Monstera Plant and Its Growth
After transplanting, a little shock is common for a couple of weeks.
Your Monstera plant has been living in water for the last few months so it will take some time to get used to living in soil.
Sometimes, Monsteras will lose a leaf or two after being moved from water to soil. Other signs of shock include leaves curling and a few turning yellow or brown.
Since it’s likely for your Monstera to go into mild shock, you will need to keep the soil lightly moist pretty consistently for the first few weeks.
Those roots have been used to living in wet conditions 24/7, so dry soil will be too much of a shock. However, don’t keep the soil soggy since you run the risk of root rot. Instead, do some light watering every few days.
After a few weeks, you should start to see new leaves sprouting.
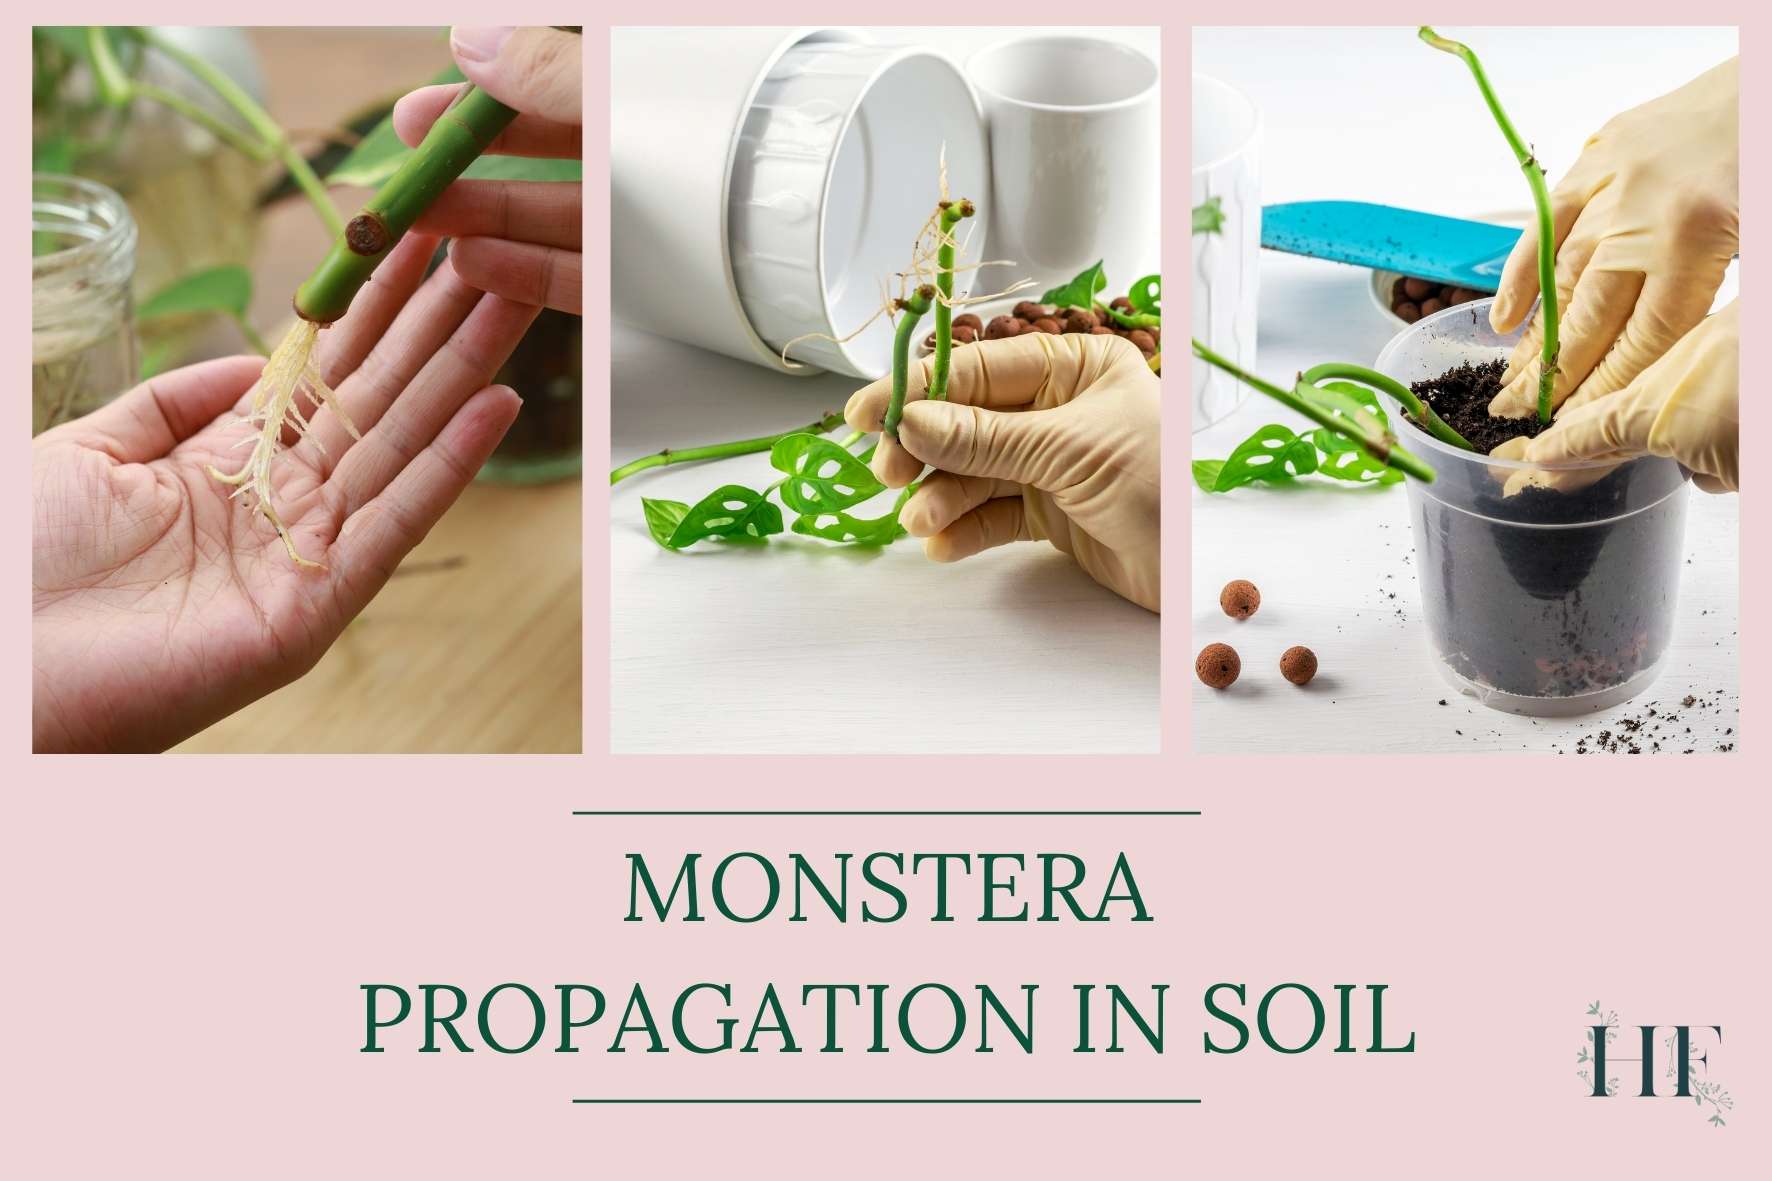
Monstera Propagation in Soil
Soil propagation is as effective as water propagation, with the added bonus that you won’t have to transplant your new plant down the road.
Pros:
- No transplanting is required.
- The cutting can benefit from the nutrients that can be found in the soil.
Cons:
- Hard to maintain consistent moisture.
- It’s not possible to check on roots forming or see signs of rot.
- Soil can become anaerobic (i.e. absence of oxygen) if overwatered.
- An organic medium can introduce fungus or disease (less frequent when using a high-quality potting mix).
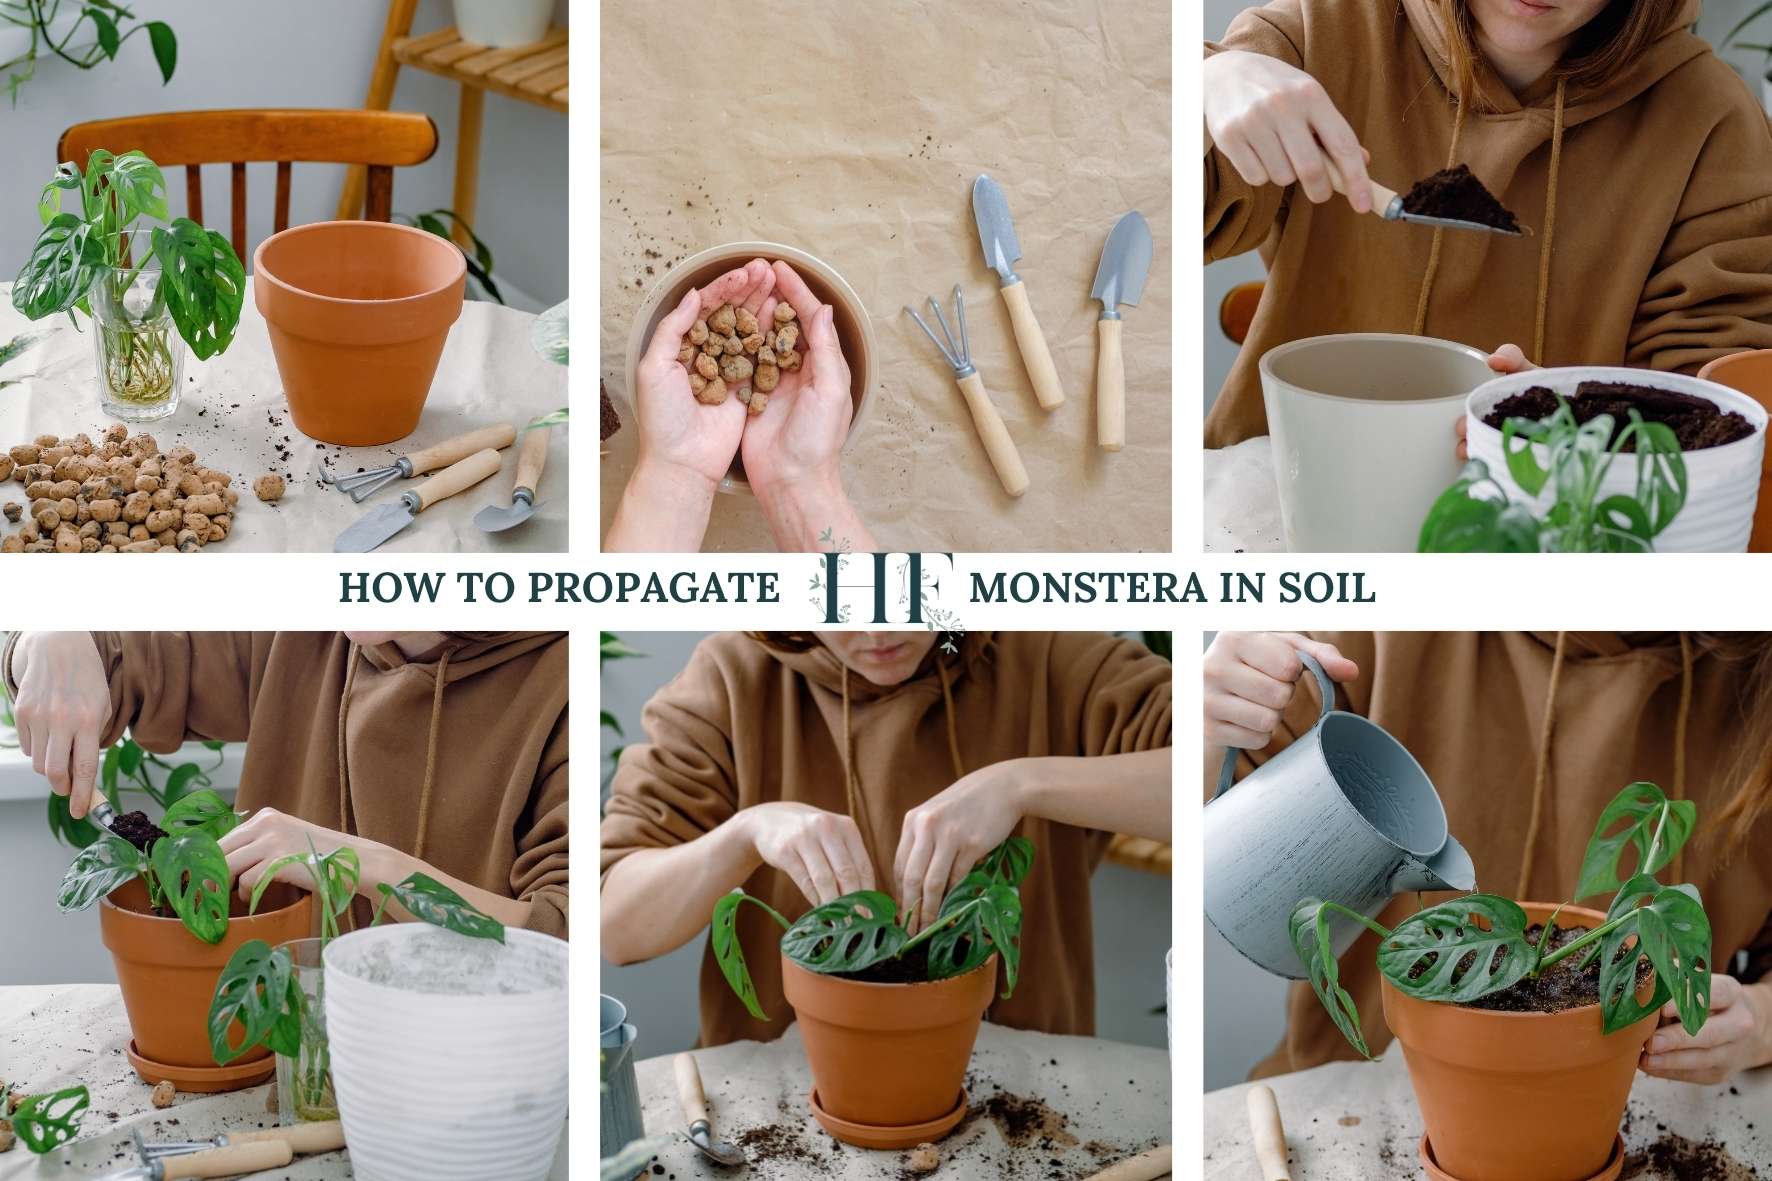
How to Propagate Monstera in Soil (Step By Step)
What you will need:
- A pair of shears: These should be already sanitized or washed with soap before taking the cutting. I recommend these shears.
- Soil mix: Monstera plants do best in a light, chunky soil mix with a pH of 5.5 to 7. Here are some options to achieve this:
- A mixture of indoor potting soil, a handful of orchid bark chips, loose coco coir, perlite or worm castings. Check my Which Type of Soil Is Best for Monstera? blog post for a Monstera repotting soil recipe.
- A ready-to-go mix of coco coir and perlite and your choice of potting mix for indoor plants.
- A Monstera specific potting soil available on Amazon.
- A pot: Choose a pot that isn’t too big, so find a pot that’s a couple of inches wider than the cluster of roots. I recommend a clear plastic pot with several drainage holes, which I then put inside a decorative cachepot. Check my How to Choose the Best Pot for Monsteras & 10 Planter Ideas blog post for more info.
- A trowel: Particularly useful to add the soil into the pot. I like keeping my gardening tools handy when propagating and repotting my houseplants.
Now that you have your tools ready, here’s how to propagate your Monstera cutting in soil:
Note: The first three steps are the same as if you propagate in water.
1) Decide Where to Cut Your Monstera that Includes a Node
Ideally, take a cutting with several nodes and leaves. Some aerial roots are helpful but not essential.
If you have a stem cutting, node cutting or wet stick, refer to the How to Propagate Monstera Node without Leaf section below.
2) Make the Cut a Few Inches Below the Node
Now, snip the cutting, using sharp shears, a few inches below the node. Then allow the cut end to fully dry (callous).
3) Treat the Cut with a Rooting Hormone (Optional Step)
Add some rooting hormone to the cut end, this is optional.
4) Plant your Unrooted Monstera Cutting in Soil
Start by filling the bottom of the pot with a little bit of soil (if you have different mediums, have the mixture ready beforehand).
Then, gently place the unrooted cutting in the middle of the pot and lightly fill in soil around the cutting until all the nodes are covered with soil. You can keep the aerial roots outside the soil.
After planting your cutting, give it plenty of water (until it runs out of the drainage holes), and then add more soil if needed.
Finally, place the potted cutting in a warm and bright location, but not in direct sunlight.
5) Continue to Care for Your Potted Monstera Cutting
It will take a while for any growth to sprout: both roots and leaves.
Meantime, water your potted Monstera twice a week, preferably early in the morning, to keep the cutting moist.
How to Propagate Monstera Node without Leaf
If you have a stem cutting (also known as node cutting or wet stick), i.e., your Monstera cutting just has one node and nothing else, the propagation process changes.
Basically, you will need to provide a high humidity environment for the stem cutting, so it can grow roots and a new leaf.
It would be difficult to root a node cutting in water because of its size and shape. Instead, you will basically create a mini greenhouse to provide your Monstera node cutting the best possible environment to grow.
What you will need:
- A container with a cover: A plastic container with a lid, a container with a freezer bag on top (big enough to seal the container) or you can also use a ziplock bag – this is to recreate a mini greenhouse.
- Growing medium: You can use sphagnum moss, coco coir, or potting mix.
- Rooting hormone (optional): I recommend Clonex rooting gel, which you can use with both water and soil propagation methods.
Here’s how to propagate a Monstera with a leafless node:
1) Set Up the Container with the Growing Medium
First, put a shallow layer of your growing medium in the bottom of the container. The layer can be just an inch thick since the stem cutting won’t be growing here for very long.
If you are using sphagnum moss, you will want to soak it in water beforehand, for around half an hour. Then, squeeze it thoroughly to get rid of excess water. It should only be moist, not soggy.
2) Apply the Rooting Hormone to the Cut End
Now, you can dip your Monstera stem node in a rooting hormone.
While optional, it will increase the chances of faster rooting and prevent rot.
3) Place the Cutting in the Container
Place your node cutting on the growing medium inside the container.
If the site cutting has a start of an aerial root coming out (a little nub emerging from one side of the node), you will want to place that side down.
You want the aerial root to be in contact with the growing medium since new stems and leaves will grow on the opposite side.
If you can’t find one, you can place any side down.
4) Mist The Cutting Lightly to Avoid Rot
Mist the cutting lightly since you want to avoid it getting too wet.
5) Cover the Container But Provide Small Ventilation
After that, seal the container close by either placing its corresponding lid or by covering it with the freezer bag or plastic wrap.
Make sure the cover is not touching the cutting because that will cause moisture to collect on that part of the plant.
Also, be sure to leave a small opening for breathing. You can make a few holes in the lid or leave some openings for ventilation. These will help to prevent the wet stick from rotting.
6) Provide Light to Encourage Healthy Growth
Place the container in a warm place with bright indirect light. Remember that direct sunlight will cause sunburn.
If the cutting is not getting enough light, you can always supplement it by using a grow light (a full spectrum one, like this one).
Also, avoid cold drafts, places near air conditioning vents or those that emit heat.
7) Keep the Growing Medium Moist But Not Soggy
While you wait for those roots to start to grow, keep an eye on the moisture levels.
A few times a week, open the bag for an hour to let your Monstera cutting breathe.
Once a week, you can mist the growing medium to ensure it remains moist but not soggy. You can check once a week and only mist it if it seems a little dry.
Insider Tip: You shouldn’t need to water your node cutting very often since the moisture will condense on the inside of the bag and create a high-humidity environment.
8) Be Patient While The Roots, an Aerial Root and a New Leaf Grows
Continue with the care routine and don’t expect to see anything happening for a few months.
It takes a lot longer for growth to come from a leafless node cutting than a top or mid-cutting because it doesn’t have leaves to capture energy from the sun.
As a guideline, a Monstera stem cutting can take around 4 months until the first new leaf unfurls.
Eventually, you should see an aerial root emerging from the node. Although exciting, there’s not much to do at this stage apart from continuing to care for the cutting as before.
The next thing that will happen is that a leaf should emerge. Then, you might need to adjust the plastic cover, so it’s not touching the leaf.
9) Plant Your Rooted Monstera Node Cutting
As the first leaf grows and more leaves emerge, it’s time to plant the cutting into a pot.
For this, you can follow the How to Propagate Monstera in Soil steps.
The only things to take into account are:
- Try not to break any of the more delicate roots when taking the cutting out of the container.
- When lifting the node cutting out of the growing medium, don’t worry if some of the growing medium is stuck on the roots. You can leave it there since it won’t cause any damage to your new plant.
- Place the cutting in the middle of the new pot and only buried halfway.
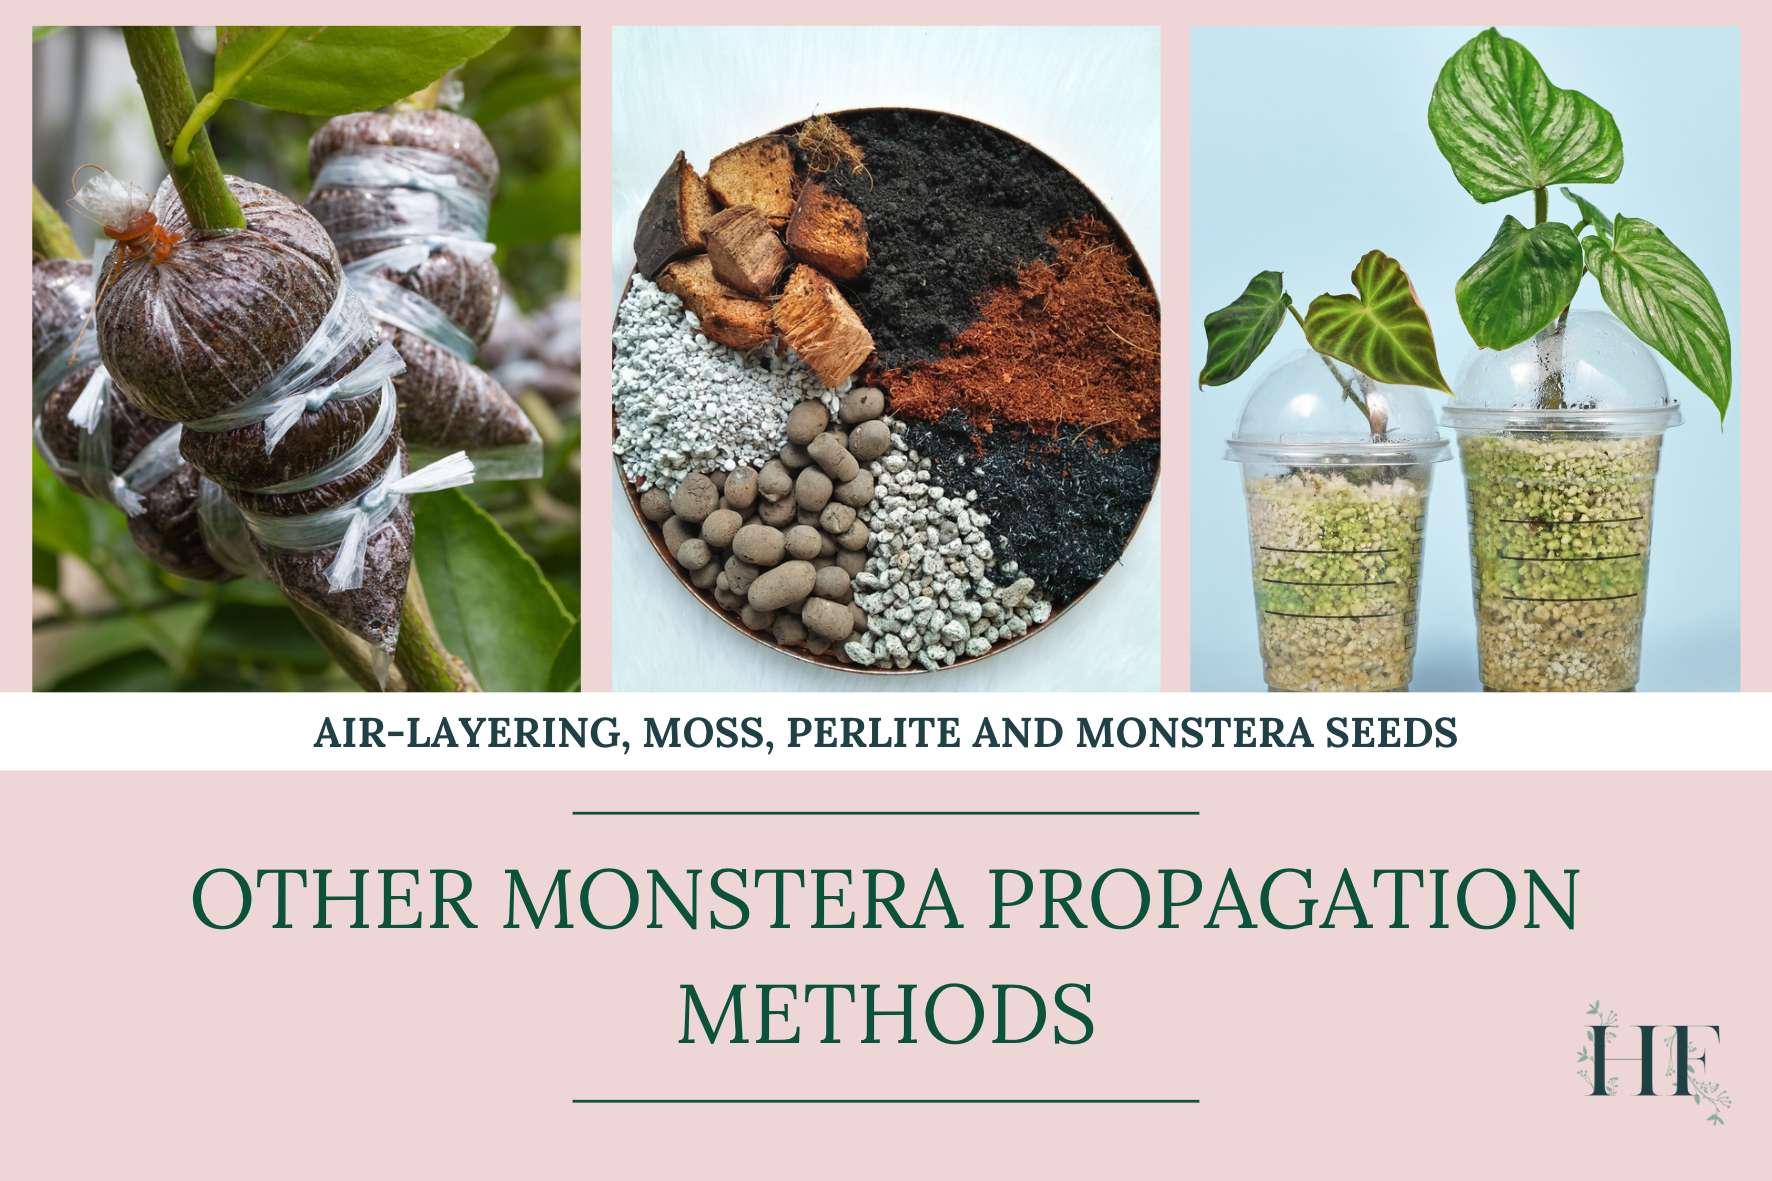
Other Monstera Propagation Methods
Apart from water and soil propagation methods, you can propagate a Monstera in moss, perlite, by air layering, and by seed.
Let’s find out if any of these methods would be suitable for you.
How To Propagate Monstera In Moss or Perlite
Moss and perlite are alternative mediums to soil. Although they have their advantages and have a high success rate, they can be challenging for beginners.
Monstera Propagation in Moss
You can also propagate in sphagnum moss instead of using soil.
Although this method can yield great results, it’s difficult to execute correctly. People often have issues caused by the moss being too wet or too dry.
Pros:
- Moist moss holds a lot of water, which is great for maintaining humidity around roots while still allowing airflow.
- It’s lightweight and easy to shape around roots.
- Transitioning the new roots into soil is easier.
Cons:
- It can easily become too compacted.
- It can be hard to maintain consistent moisture.
- It’s not possible to check on the roots whilst they are forming or for any signs of rot.
- When transitioning into soil, it’s easy to damage the roots and it can be time-consuming.
- Since moss is an organic medium, it can introduce fungus or disease.
What you will need:
- A container without drainage holes.
- Growing medium: Sphagnum moss.
- A cover: Clear plastic bag, a freezer bag or even cling film. This will hold humidity in the container.
To propagate your Monstera in moss, lightly moisten the sphagnum moss, pop the cutting in there and then place the whole thing in a clear plastic bag to keep moisture and warmth in.
Follow the steps for How to Propagate Monstera Node without Leaf just using moss instead of soil.
Monstera Propagation in Perlite
Perlite has very similar benefits to water, with the addition of greater airflow.
Pros:
- Perlite provides greater airflow than water propagation.
- It provides the right amount of moisture to the cutting. Perlite is absorbent and porous, so it will wick moisture up to areas of the container that are not underwater.
- There is less risk of rot than when propagating in soil since perlite is an inorganic material.
- It’s lightweight, which allows you to transfer the cutting easily when it’s time to pot in soil.
Cons:
- It can be hard to maintain consistent moisture.
- It’s not possible to check on the roots whilst they are forming or for any signs of rot.
What you will need:
- A container without drainage holes.
- Growing medium: Perlite – this one is coarse perlite (choose size 3 or 4 to minimize dust) and has no fertilizer.
- A cover: Clear plastic bag, a freezer bag or even cling film. This will hold humidity in the container.
To propagate your Monstera in perlite, add perlite and then fill it with water below the level of the stem. Then, cover the top to hold in humidity around the roots.
Some rooting powder can also be helpful in speeding up the process.
For more detailed steps, you can refer to How to Propagate Monstera Node without Leaf, just using perlite instead of soil.
How to Air Layer Monstera (The No-Cutting Method)
If you are concerned about taking a cutting from your Monstera plant, you might want to give air layering a go. Using sphagnum moss wrapped in a plastic bag, you can propagate your Monstera Deliciosa in situ.
Air layering involves tricking a plant into growing roots before you actually make the cut. It’s usually used for woody plants that are difficult to root using common methods. But Monstera Deliciosa, with its thicker stem, is a great candidate too.
Pros:
- This method has a very low chance of rot.
- Roots grow faster because the cutting can use energy from the entire plant.
- It also has a very low chance of leaf or node loss on cuttings.
Cons:
- It doesn’t work for top cuttings that don’t yet have aerial roots.
- This method cannot be used for rootless cuttings.
Air Layering Monstera Deliciosa
What you will need:
- A plastic wrap.
- Rubber bands or ties: You can also use twist ties to secure the wrapping around the plant stem.
- Growing medium: Sphagnum moss.
- Rooting hormone: Apart from stimulating growth, it also lowers the risk of rot and disease. I recommend Clonex rooting gel.
Here’s how you do it:
- Select the stem you want to propagate and find a node (this is where the roots will be growing from).
- You could make a slice (or incision) where you would cut it, a few inches below the node. However, this is not necessary with Monstera plants since the rooting hormone works without needing to slice the stem.
- Apply the rooting hormone on the node and around it.
- Soak the sphagnum moss for a while and then squeeze it so that it’s moist (not soaking wet).
- Apply the moss around the node.
- Cover it with a plastic bag or wrapping, you can make some holes to provide ventilation.
- Then, use ties to seal it close at the top and bottom, keeping the wrapping in place.
- New roots appear within a few months. Meantime, keep an eye on the moss to make sure it doesn’t dry out. You will have to remove the wrap to remoisten the moss when it dries. You can use a mister to do this.
- Once a good root ball has formed, you can remove the wrap and moss.
- Use a pair of clean sharp shears to snip just below the roots.
- Now you can plant the rooted cutting in soil. Follow the steps on How to Propagate Monstera in Soil (from step 4 onwards) for potting mix and care instructions.
How To Propagate Monstera From Seeds
This is probably the most difficult propagation method for Monstera plants.
Although many Monstera varieties grow flowers and fruit, they rarely do it when kept as a houseplant. Since it’s unlikely for you to harvest the seeds from a fruiting Monstera plant, you would most likely have to purchase them.
A small warning… There are some sellers that provide fake seeds advertising them as real Monstera seeds. It’s best to read the reviews and buy from a reputable seller.
Insider Tip: A real Monstera seed will have the size and looks of something resembling a kernel of corn. The small, pale green seeds also have a very short shelf life, so, they must be planted as soon as possible.
Also, I wouldn’t recommend buying seeds labelled to be variegated Monstera since it’s impossible to tell if a monstera seed will actually produce a variegated plant, even if they were harvested from a plant with variegation. The only way to guarantee variegation is to purchase a cutting from a variegated plant.
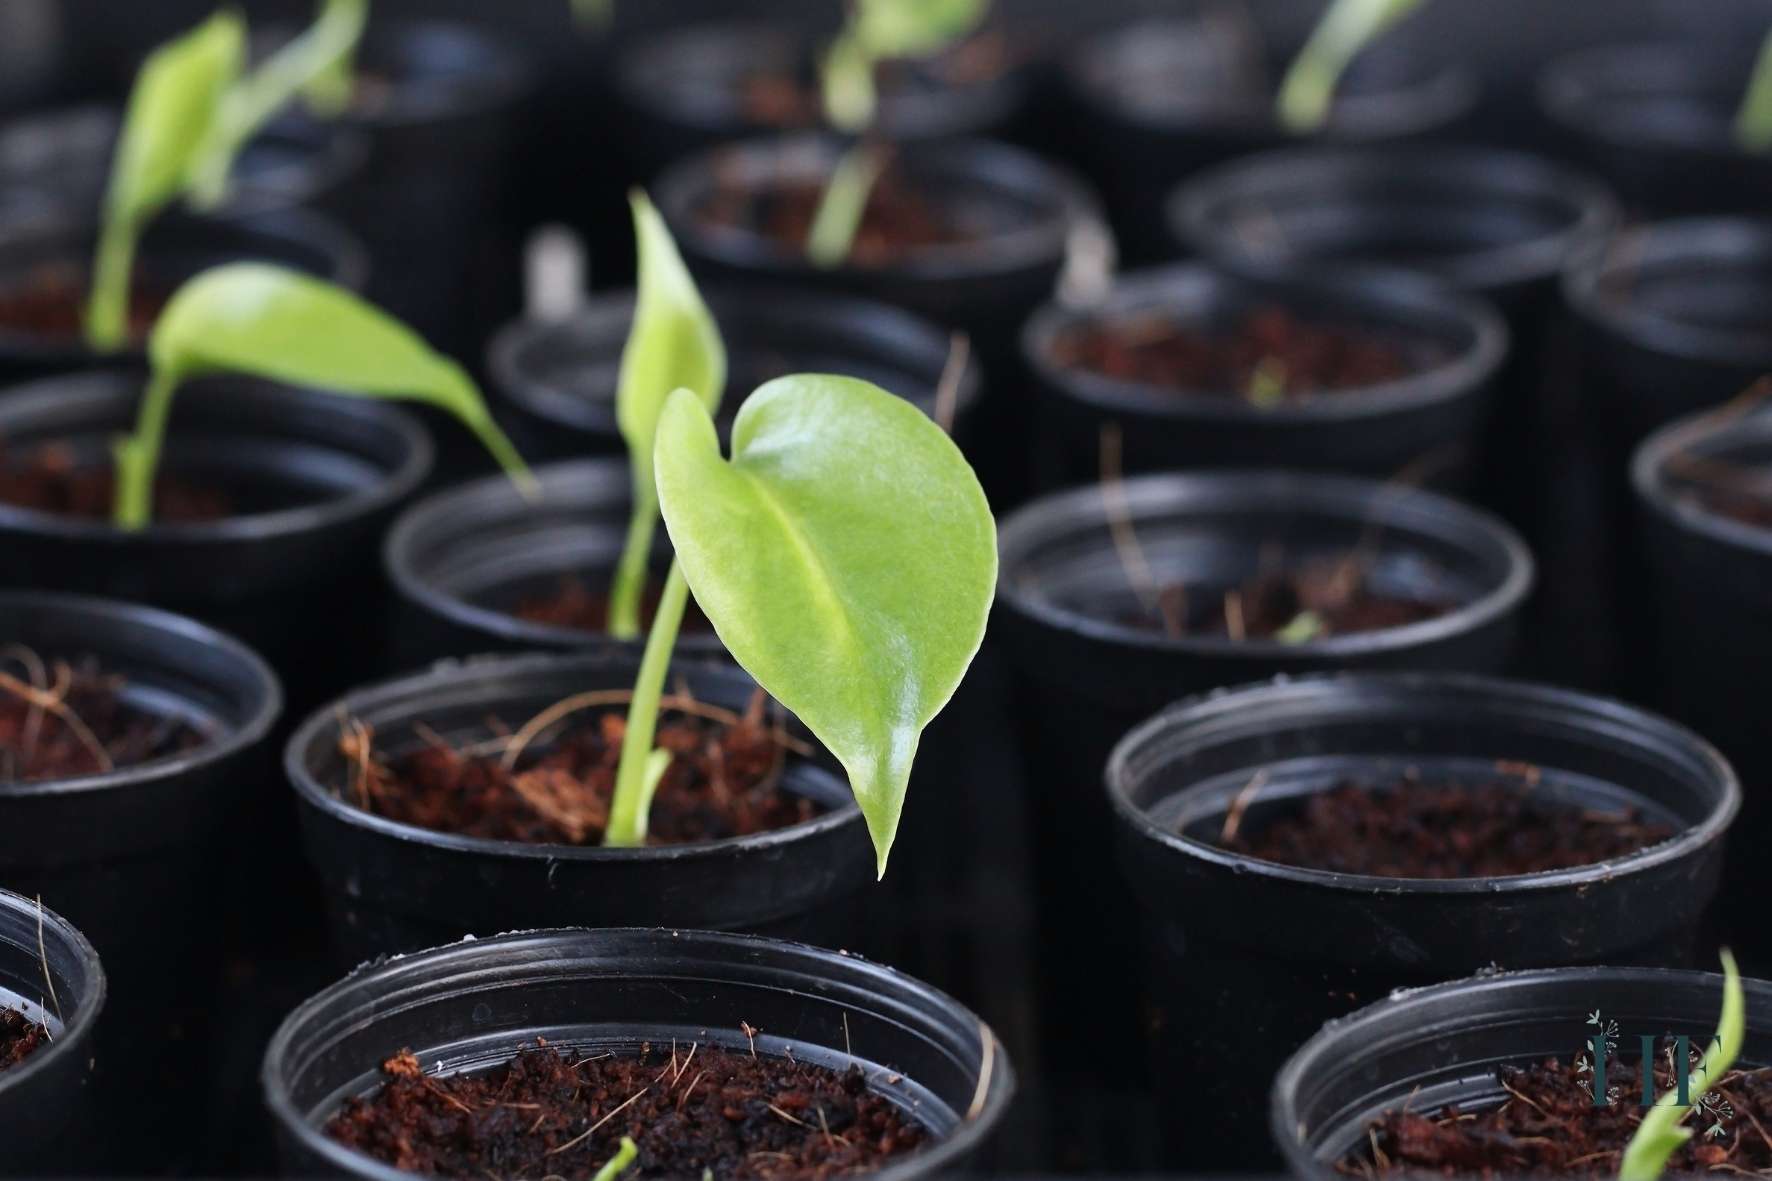
Although you can germinate Monstera seeds at home, growing a Monstera from seeds is a long process and it will take months before you see the first leaf appearing – even in ideal conditions!
Seeds will germinate within weeks but they are extremely slow to develop.
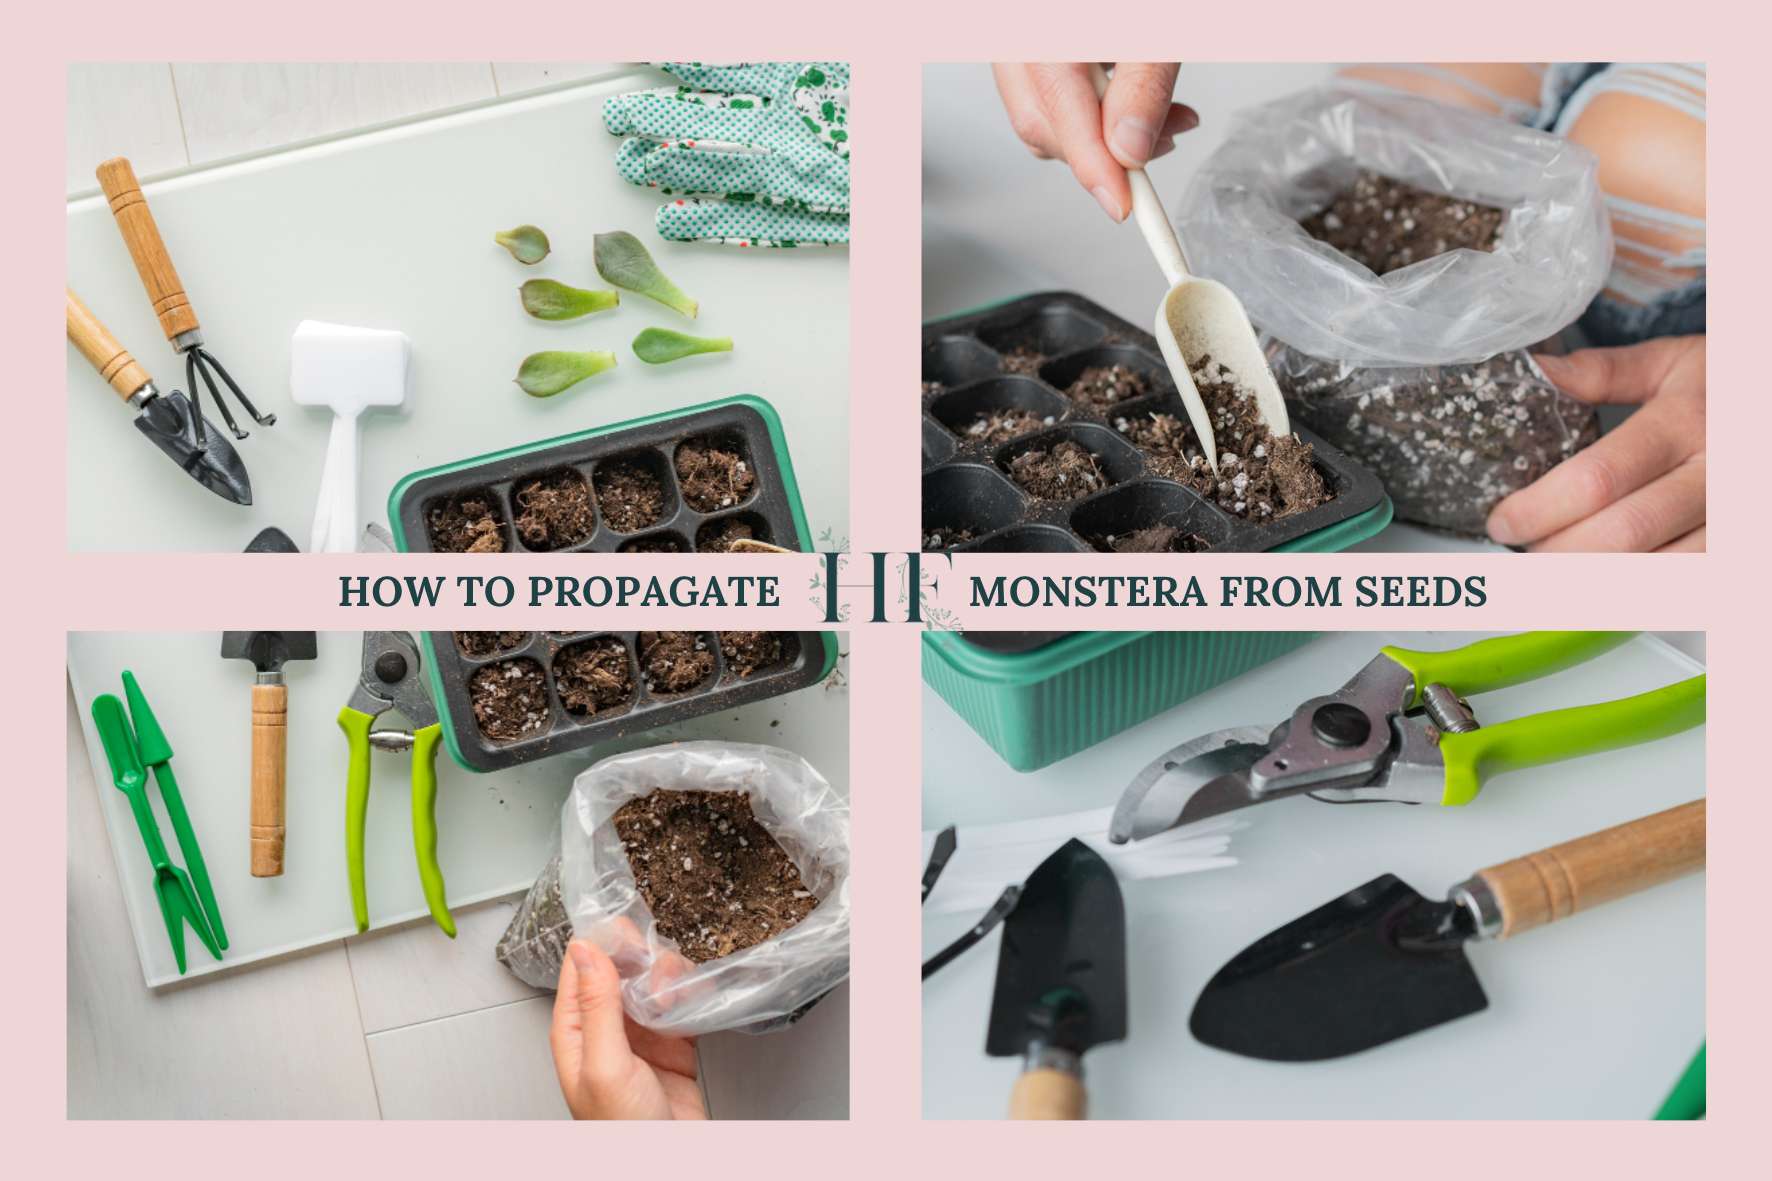
How to Grow Monstera from Seeds
What you will need:
- A container or tray: It can either be a shallow container with drainage holes or a seedling start tray.
- A cover or cling film: If using a container, cover it with cling film. Some seeding start trays come with a cover, otherwise use a clear bag or cling film.
- Potting mix: I recommend this organic potting soil mix.
- Monstera seeds: Start your seeds as soon as you get them because they aren’t viable for long after they’re harvested from the fruit.
Here’s how to propagate Monstera from seeds:
- Soak the Monstera seeds for 12 to 24 hours before planting in lukewarm water, and leave the seeds somewhere warm.
- Add soil to the container or tray.
- Bury the seeds in the soil. When using a tray, you can place one seed per pot.
- Then, water thoroughly.
- Cover it – This is to keep the humidity levels around the seeds high.
- Place the container under bright indirect light (avoid direct sunlight).
- Keep your seeds under warm and moist conditions.
- Once your seedlings have sprouted, you can remove the cling film.
I would love you to share your propagation journey with me 🙂 Comment below and tell us about your challenges and propagating hacks!

Hi I am propagating a monstera cutting currently in water . It is a single
Leaf and thing it’s a mid cutting. My auxiliary node now has a white growth coming from it now. I think from your guide this is new growth – not a root? The only roots are on an arial root and about an inch long (a lot of them) – should I move to soil? If so do I plant with the auxiliary node under the soil? Any advice would be amazing thank you.